须知
本文默认您已经安装好了 docker 并了解 docker 的一些基本概念
如果您是纯命令行环境,本文将默认你会命令行最基本的使用(如创建文件/文件夹、编辑文本等)
mihomo 是 clash 的一个分支,也是目前使用最广泛的分支,各平台许多客户端使用的核心均为 mihomo,或者它曾经还有个可能更多人听过的名字叫 mihomo meta。
需要说明的是 mihomo 与最原始的 clash 本身都是一个纯命令行程序,这意味着它本身没有图形界面,但本文会讲到如何配置 mihomo 的 webUI,以便日常使用。
编写 mihomo 配置文件
新建一个空文件夹命名为 mihomo,在其中新建文本文档 config.yaml
可参考下方模板来创建您自己的配置文件,模板参考自官方文档,如果你希望了解配置文件的具体规则,同样请参考官方文档。(本文最后有链接)
该模板中必须要修改的是第 19、20 行与 25 行,根据实际情况进行填写,修改模板后不含模板中的尖括号。其中节点提供者名称可自由填写,用于程序区分多个订阅;节点名称前缀会在显示节点信息时插入到原始节点名称前,便于自己区分不同订阅的节点。
第 1 行为代理端口设置,第 6 行为外部控制端口设置(如使用 webUI 控制 mihomo)如有需要可自行更改。
# =================== 基础设置 ===================
mixed-port: 7890
allow-lan: true
bind-address: '*'
mode: rule
log-level: warning
external-controller: '0.0.0.0:9090'

# =================== 连接优化与实验性功能 ===================
tfo: true
experimental:
  http2: true                    # 提升网页/YouTube加载速度
  sniff-tls-sni: false           # 更兼容,避免部分网站 TLS 握手失败

# =================== Profile 与连接优化 ===================
profile:
  store-selected: true
  store-fake-ip: true

unified-delay: true
keep-alive-interval: 15          # 每15秒保活长连接
tcp-concurrent: true
global-client-fingerprint: chrome

# =================== 嗅探(新版,无警告)===================
sniff:
  enabled: true
  include:
    - tls
    - http
  parse-pure-ip: true
  override-destination: true
  force-dns-mapping: true
  skip-domain:
    - "+.local"
    - "+.lan"
    - "localhost"
    - "+.alipay.com"
    - "+.tenpay.com"
    - "mch.weixin.qq.com"

# =================== 代理节点提供者 ===================
proxy-providers:
  自己:
    type: file
    path: ./subs-check/output/mihomo.yaml
    interval: 3600
    health-check:
      enable: true
      url: "https://www.gstatic.com/generate_204"
      interval: 300
      timeout: 3000
      lazy: true
      method: GET
      disable-keepalive: true
    override:
      additional-prefix: "MY_"

  IKUUU:
    url: "https://rze57.no-mad-world.club/link/WM9j6NcfU4Odu20u?clash=3&extend=1"
    type: http
    interval: 3600
    health-check:
      enable: true
      url: "https://www.gstatic.com/generate_204"
      interval: 300
      timeout: 3000
      lazy: true
      method: GET
      disable-keepalive: true
    override:
      additional-prefix: "IKUUU_"

# =================== 本地代理 ===================
proxies:
  - name: "🎯 直连"
    type: direct
    udp: true
  - name: "🛑 拒绝"
    type: reject
    udp: true

# =================== Geo 数据源(使用 github.dpik.top 加速)===================
geodata-mode: true
geox-url:
  geoip: "https://github.dpik.top/MetaCubeX/meta-rules-dat/releases/download/latest/geoip.dat"
  geosite: "https://github.dpik.top/MetaCubeX/meta-rules-dat/releases/download/latest/geosite.dat"
  mmdb: "https://github.dpik.top/MetaCubeX/meta-rules-dat/releases/download/latest/country-lite.mmdb"
  asn: "https://github.dpik.top/MetaCubeX/meta-rules-dat/releases/download/latest/GeoLite2-ASN.mmdb"

# =================== DNS 设置 ===================
dns:
  enable: true
  prefer-h3: true
  ipv6: false
  respect-rules: true
  enhanced-mode: fake-ip
  fake-ip-range: 198.18.0.1/16
  fake-ip-filter:
    - "+.lan"
    - "+.local"
    - "localhost"
    - "+.market.xiaomi.com"

  proxy-server-nameserver:
    - 223.5.5.5
    - 119.29.29.29
    - https://223.5.5.5/dns-query

  default-nameserver:
    - 223.5.5.5
    - 119.29.29.29

  namesater:
    - https://120.53.53.53/dns-query
    - https://223.5.5.5/dns-query

  fallback:
    - https://cloudflare-dns.com/dns-query
    - https://dns.google/dns-query
    - https://1.1.1.1/dns-query

  fallback-filter:
    geoip: true
    geoip-code: CN
    ipcidr:
      - 240.0.0.0/4
      - 0.0.0.0/8
    domain:
      - "+.google.com"
      - "+.gstatic.com"
      - "+.facebook.com"
      - "+.twitter.com"
      - "+.telegram.org"
      - "+.youtube.com"
      - "+.netflix.com"
      - "+.googleusercontent.com"

  nameserver-policy:
    "geosite:cn,private":
      - https://120.53.53.53/dns-query
      - https://223.5.5.5/dns-query
    "geosite:geolocation-!cn":
      - https://cloudflare-dns.com/dns-query
      - https://dns.google/dns-query

# =================== 代理组 (移除AI和奈飞专用组) ===================
proxy-groups:
  - name: "⚡ 超高速节点"
    type: url-test
    use: ["自己", "IKUUU"]
    url: "https://www.gstatic.com/generate_204"
    interval: 300
    tolerance: 100
    lazy: true
    max-failed-times: 3

  - name: "🚀 高速节点"
    type: url-test
    use: ["自己", "IKUUU"]
    url: "https://www.gstatic.com/generate_204"
    interval: 300
    tolerance: 50
    timeout: 3000
    lazy: true

  - name: "🚀 节点选择"
    type: select
    proxies:
      - "⚡ 超高速节点"
      - "🚀 高速节点"
      - "🚀 手动切换"
      - "🎯 直连"

  - name: "🚀 手动切换"
    type: select
    include-all: true

  - name: "📱 电报消息"
    type: select
    proxies:
      - "⚡ 超高速节点"
      - "🚀 高速节点"
      - "🚀 手动切换"

  - name: "📺 油管视频"
    type: select
    proxies:
      - "⚡ 超高速节点"
      - "🚀 高速节点"
      - "🚀 手动切换"

  - name: "📺 哔哩哔哩"
    type: select
    proxies:
      - "🎯 直连"
      - "🚀 节点选择"

  - name: "🇨🇳 国内媒体"
    type: select
    proxies:
      - "🎯 直连"

  - name: "🐟 漏网之鱼"
    type: select
    proxies:
      - "🚀 节点选择"
      - "🚀 手动切换"
      - "🎯 直连"


# =================== 规则提供者 (移除 Telegram/YouTube/ProxyGFWlist 的外部文件) ===================
rule-providers:
  LocalAreaNetwork:
    url: "https://testingcf.jsdelivr.net/gh/ACL4SSR/ACL4SSR@master/Clash/LocalAreaNetwork.list"
    path: ./ruleset/LocalAreaNetwork.list
    behavior: classical
    interval: 86400
    format: text
    type: http
  UnBan:
    url: "https://testingcf.jsdelivr.net/gh/ACL4SSR/ACL4SSR@master/Clash/UnBan.list"
    path: ./ruleset/UnBan.list
    behavior: classical
    interval: 86400
    format: text
    type: http

# =================== 规则 ===================
rules:
  - "PROCESS-NAME,subs-check.exe,🎯 直连"
  - "PROCESS-NAME,subs-check,🎯 直连"
  - "RULE-SET,LocalAreaNetwork,🎯 直连"
  - "RULE-SET,UnBan,🎯 直连"
  - "GEOSITE,private,🎯 直连"
  - "GEOSITE,telegram,📱 电报消息"
  - "GEOSITE,youtube,📺 油管视频"
  - "GEOSITE,gfw,🚀 节点选择"
  - "GEOSITE,cn,🎯 直连"
  - "GEOIP,CN,🎯 直连"
  - "MATCH,🐟 漏网之鱼"
安装mihomo和webUI
对于 metacubexd 服务:
docker run -d \
  --name metacubexd \
  --restart always \
  -p 9097:80 \
  ghcr.io/metacubex/metacubexd
对于 mihomo 服务:
由于mihomo使用了host网络模式、添加了所有的Linux capabilities (cap_add: – ALL),并且挂载了一些特殊的卷(如/dev/net/tun),其docker run命令稍微复杂一些。请确保替换
docker run -d \ --name mihomo \ --restart always \ --pid host \ --ipc host \ --network host \ --cap-add ALL \ -v:/root/.config/mihomo \ -v /dev/net/tun:/dev/net/tun \ docker.io/metacubex/mihomo:latest
打开 webUI 并开始使用
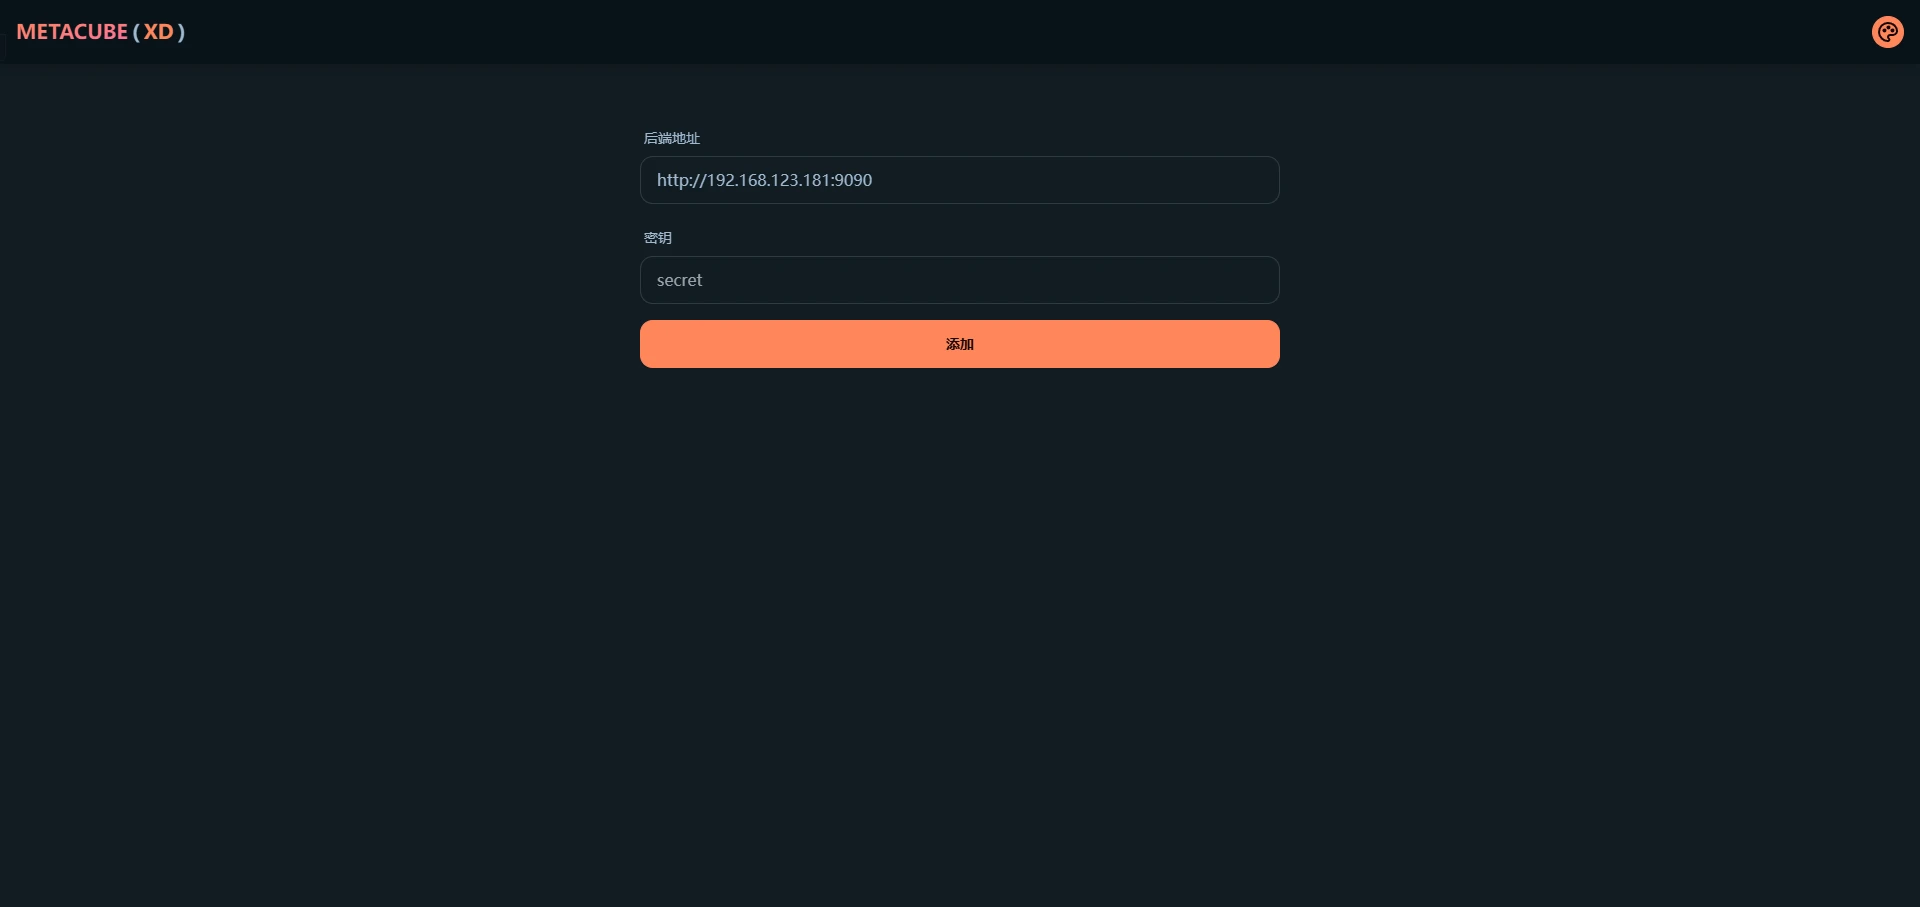
在局域网内任意设备浏览器中输入 设备IP:9097 即可访问 metacubexd 的界面,后端地址填写 http://设备IP:9090 ,密钥留空即可,如图所示,点击添加便可管理 mihomo 的各项配置。若在前文中修改了 webUI 访问端口和外部控制端口,请自行替换为自己设置的端口号。
如果你使用 metacubexd 更改了一些设置,那将只会在 mihomo 的本次运行生效,重启 mihomo 会将所有设置重置为你第一步在 config.yaml 中所填写的配置
至此已搭建完成,在需要使用网络代理的地方在代理选项内填入
设备IP:7890 即可使用。