
搜索到
217
篇与
的结果
-

-
【深度学习KylinOS三】【麒麟系统环境安装之Nginx】安装nginx--银河麒麟V10(Kylin Linux Advanced Server release V10 (Tercel))操作系统 服务器环境在 arm64(aarch64) 架构服务器上基于国产化操作系统安装 Nginx 服务获取源代码软件获取门路:http://nginx.org/download/nginx官网:http://nginx.org/编译前期情况设置履行如下下令,装置依附包。yum install gcc gcc-c++ make unzip pcre pcre-devel zlib zlib-devel libxml2 libxml2-devel readline readline-devel ncurses ncurses-devel perl-devel perl-ExtUtils-Embed openssl-devel -y编译源代码并安装履行以下下令,获取装置包。wget -c http://nginx.org/download/nginx-1.16.1.tar.gz履行以下下令,解压装置包。tar -zxvf nginx-1.16.1.tar.gz履行以下下令,进入装置目次。cd nginx-1.16.1履行以下下令,编译装置nginx。./configure make -j4 && make install测试已实现编译的软件新增nginx用户useradd nginx履行以下下令,给nginx用户开启nginx装置目次权限。chown nginx:nginx /usr/local/nginx履行如下下令,检查nginx版本。cd /usr/local/nginx/sbin/ ./nginx -v启动nginxcd /usr/local/nginx/sbin/ ./nginx检查能否启动胜利ps -ef | grep nginx设置nginx开机自启动进入到/lib/systemd/system/目次cd /lib/systemd/system/创立nginx.service文件,并编纂# vim nginx.service [Unit] Description=nginx After=network.target [Service] Type=forking ExecStart=/usr/local/nginx/sbin/nginx -c conf/nginx.conf ExecReload=/usr/local/nginx/sbin/nginx -s reload ExecStop=/usr/local/nginx/sbin/nginx -s quit PrivateTmp=true [Install] WantedBy=multi-user.target参加开机自启动systemctl enable nginx #假如不想开机自启动了,能够应用上面的下令撤消开机自启动 systemctl disable nginx效劳的启动/结束/革新设置文件/检查状况#systemctl start nginx.service 启动nginx效劳 # systemctl stop nginx.service 结束效劳 # systemctl restart nginx.service 从新启动效劳 # systemctl list-units --type=service 检查全部已启动的效劳 # systemctl status nginx.service 检查效劳以后状况 # systemctl enable nginx.service 设置开机自启动 # systemctl disable nginx.service 结束开机自启动一个罕见的过错Warning: nginx.service changed on disk. Run 'systemctl daemon-reload' to reload units.直接依照提醒履行下令systemctl daemon-reload 即可。systemctl daemon-reload
-
【深度学习KylinOS二】【麒麟系统环境安装之Mysql】银河麒麟服务器V10 aarch64安装mysql8.0教程 服务器环境在 arm64(aarch64) 架构服务器上基于国产化操作系统安装 Mysql 服务## 查看系统版本,确认版本 cat /etc/kylin-release Kylin Linux Advanced Server release V10 (Tercel) ## 操作系统 uname -p aarch64 ## 内核版本(≥ 3.10) uname -r 4. 19.90-21.2.ky10.aarch64 ## iptables 版本(≥ 1.4) iptables --version iptables v1.8.1 (legacy)软件安装需先卸载mariadb-server、mariadb-commonyum remove mariadb-server mariadb-common下载安装包下载地址:https://downloads.mysql.com/archives/community/可以直接用命令下载:wget -c https://downloads.mysql.com/archives/get/p/23/file/mysql-8.1.0-1.el8.aarch64.rpm-bundle.tar解压:tar xvf mysql-8.1.0-1.el8.aarch64.rpm-bundle.tar安装:yum install -y ./mysql-community-server-8.1.0-1.el8.x86_64.rpm yum install -y ./mysql-community-client-8.1.0-1.el8.x86_64.rpm yum install -y ./mysql-community-libs-8.1.0-1.el8.x86_64.rpm yum install -y ./mysql-community-server-8.1.0-1.el8.x86_64.rpm yum install -y ./mysql-community-common-8.1.0-1.el8.x86_64.rpm 如果嫌弃麻烦,那就直接全部安装 yum install -y ./mysql-community-*启动mysqldsystemctl start mysqld设置开机启动systemctl enable mysqldMySQL默认密码和修改密码grep 'temporary password' /var/log/mysqld.log mysql -uroot -p修改密码ALTER USER 'root'@'localhost' IDENTIFIED BY 'sfa33afFASD!@#';重新登录搞定收工
-
【深度学习KylinOS一】【麒麟系统环境安装之Docker】麒麟系统V10 怎么使用自带的docker 麒麟系统安装docker 服务器环境在 arm64(aarch64) 架构服务器上基于国产化操作系统安装 docker 服务## 查看系统版本,确认版本 cat /etc/kylin-release Kylin Linux Advanced Server release V10 (Tercel) ## 操作系统 uname -p aarch64 ## 内核版本(≥ 3.10) uname -r 4. 19.90-21.2.ky10.aarch64 ## iptables 版本(≥ 1.4) iptables --version iptables v1.8.1 (legacy)吐槽所谓的国产操作系统在我看来即换皮改名操作系统,不可否认他们在权限审计方面做的比原版开源的操作系统更复杂更细腻(但是这些应该都可以自己通过 PAM 之类的配置吧)。由于工作原因需要接触当前主流的大部分 GNU/Linux、*BSD、国产操作系统,在目前已接触的多款所谓的基于 Debian 或 Fedora 二次开发的操作系统中感触最深的不是他们上面加的各种权限审计限制,而是他们改了包名导致在安装 deb 或者 rpm 包时出现各种依赖问题。例如 CentOS7 的 rpm 包标识为 el7 麒麟上面则改成了 ky10,在安装一些软件时由于依赖问题导致同名包安装不上,如果卸载系统上已有包可能会出现系统某些软件服务出现问题,如果不卸载则只能带上痛苦面具去解决冲突。真就自主研发靠改名了。国产的各种麒麟操作系统由于使用者多为政府单位,运行环境又是隔离内网,导致一般情况下只有安装光盘没有完整的软件源寻找软件源据说银河麒麟基于 CentOS7,但是通过测试最终添加 CentOS8 的源才可以用,因为他喵的 CentOS7 只有 x86_64,而 CentOS8 才有 aarch64,厂商的话都信不得哦。手动配置了 CentOS8 的源后,yum makecache 可以正常缓存,但是 yum -y update 会出现多个依赖错误问题,通过 yum -y install package-name 可以安装软件,但是依赖问题依然很难受。最终在配置好 CentOS8 与 Docker-ce 官方源后由于依赖问题放弃了通过 yum 在线安装,直接下载如下 rpm 包安装依然不行。通过二进制安装 docker通过在线软件源和 rpm 包不能直接安装,那么只能选择通过编译安装了,去官网找了下发现提供有编译好的 docker 二进制包,直接下载二进制包安装吧,感谢 golang 的跨平台性。安装条件64位的操作系统# uname -p aarch64Linux 内核版本 ≥ 3.10# uname -r 4. 19.90-17.ky10.aarch64iptables 版本 ≥ 1.4# iptables --version iptables v1.8.1 (legacy)一个 ps 可执行文件,通常由 procps 或类似的包提供。安装 Docker选择并下载 docker-ce 二进制包文件官网下载地址: Index of linux/static/stable/aarch64/wget https://download.docker.com/linux/static/stable/aarch64/docker-20.10.7.tgz解压下载好的压缩包tar -zxvf docker-20.10.7.tgz移动解压出来的二进制文件到 /usr/bin 目录中mv docker/* /usr/bin/测试启动dockerd添加 systemd添加 docker 的 systemd 服务脚本至 /usr/lib/systemd/system/脚本参考自 https://github.com/docker/docker-cevim /usr/lib/systemd/system/docker.service [Unit] Description=Docker Application Container Engine Documentation=https://docs.docker.com After=network-online.target docker.socket firewalld.service containerd.service Wants=network-online.target Requires=docker.socket containerd.service [Service] Type=notify # the default is not to use systemd for cgroups because the delegate issues still # exists and systemd currently does not support the cgroup feature set required # for containers run by docker ExecStart=/usr/bin/dockerd -H fd:// --containerd=/run/containerd/containerd.sock ExecReload=/bin/kill -s HUP $MAINPID TimeoutStartSec=0 RestartSec=2 Restart=always # Note that StartLimit* options were moved from "Service" to "Unit" in systemd 229. # Both the old, and new location are accepted by systemd 229 and up, so using the old location # to make them work for either version of systemd. StartLimitBurst=3 # Note that StartLimitInterval was renamed to StartLimitIntervalSec in systemd 230. # Both the old, and new name are accepted by systemd 230 and up, so using the old name to make # this option work for either version of systemd. StartLimitInterval=60s # Having non-zero Limit*s causes performance problems due to accounting overhead # in the kernel. We recommend using cgroups to do container-local accounting. LimitNOFILE=infinity LimitNPROC=infinity LimitCORE=infinity # Comment TasksMax if your systemd version does not support it. # Only systemd 226 and above support this option. TasksMax=infinity # set delegate yes so that systemd does not reset the cgroups of docker containers Delegate=yes # kill only the docker process, not all processes in the cgroup KillMode=process OOMScoreAdjust=-500 [Install] WantedBy=multi-user.target根据 docker.service 中 Unit.After 需求添加 docker.socket 脚本至 /usr/lib/systemd/system/脚本参考自 https://github.com/docker/docker-cevim /usr/lib/systemd/system/docker.socket [Unit] Description=Docker Socket for the API [Socket] # If /var/run is not implemented as a symlink to /run, you may need to # specify ListenStream=/var/run/docker.sock instead. ListenStream=/run/docker.sock SocketMode=0660 SocketUser=root SocketGroup=docker [Install] WantedBy=sockets.target注意:如果缺少该文件,启动 docker 时会报如下错误:# systemctl start docker Failed to start docker.service: Unit docker.socket not found.根据 docker.service 中 Unit.After 需求添加 containerd.service 脚本至 /usr/lib/systemd/system/vim /usr/lib/systemd/system/containerd.service # Copyright The containerd Authors. # # Licensed under the Apache License, Version 2.0 (the "License"); # you may not use this file except in compliance with the License. # You may obtain a copy of the License at # # http://www.apache.org/licenses/LICENSE-2.0 # # Unless required by applicable law or agreed to in writing, software # distributed under the License is distributed on an "AS IS" BASIS, # WITHOUT WARRANTIES OR CONDITIONS OF ANY KIND, either express or implied. # See the License for the specific language governing permissions and # limitations under the License. [Unit] Description=containerd container runtime Documentation=https://containerd.io After=network.target local-fs.target [Service] ExecStartPre=-/sbin/modprobe overlay ExecStart=/usr/bin/containerd Type=notify Delegate=yes KillMode=process Restart=always RestartSec=5 # Having non-zero Limit*s causes performance problems due to accounting overhead # in the kernel. We recommend using cgroups to do container-local accounting. LimitNPROC=infinity LimitCORE=infinity LimitNOFILE=infinity # Comment TasksMax if your systemd version does not supports it. # Only systemd 226 and above support this version. TasksMax=infinity OOMScoreAdjust=-999 [Install] WantedBy=multi-user.target注意:如果缺少该文件,启动 docker 时会报如下错误:# systemctl restart docker Failed to restart docker.service: Unit containerd.service not found.重载 systemd 配置文件systemctl daemon-reload创建 docker 组groupadd docker如不创建 docker 组在通过 systemctl 启动时会报错如下Dependency failed for Docker Application Container Engine. Job docker.service/start failed with result 'dependency'.启动 docker 服务systemctl start docker systemctl enable docker修改 docker 配置文件并查看安装好的 docker 基本信息在 /etc/docker/daemon.json 中添加如下内容:vim /etc/docker/daemon.json vim /etc/docker/daemon.json { "data-root":"/data/docker", "exec-opts":[ "native.cgroupdriver=systemd" ] }重启 docker 服务systemctl restart docker查看 docker info常用操作命令1.查看系统版本,确认版本 # cat /etc/kylin-release Kylin Linux Advanced Server release V10 (Tercel) 2. 查看系统架构(服务器如果是鲲鹏,架构是aarch64) # uname -p aarch64 3. 内核版本 # uname -r 4. 19.90-23.8.v2101.ky10.aarch64 4. iptables版本 # iptables --version iptables v1.8.1 (legacy) 5. 启动docker systemctl start docker systemctl enable docker 6. 获取操作系统的版本详细信息 lsb_release -a(第一种) cat /etc/os-release (第二种) 7. 查看系统是64位还是32位 第一种方式:getconf LONG_BIT 第二种方式:file /bin/ls 第三种方式:lsb_release -a 8. 查看linux版本 第一种方式使用这个命令查看 lsb_release -a 第二种方式使用这个命令查看cat /etc/issue(仅适用于linux) 第三种方式使用这个命令查看 执行cat /etc/redhat-release 9. 查看CPU配置信息 cat /proc/cpuinfo lscpu 10. 查看内存配置信息 cat /proc/meminfo 11. 查看硬盘信息 df -h 12. 查看当前linux的版本 cat /etc/redhat-release rpm -q centos-release 13. 修改DNS配置 vim /etc/resolv.conf 14. 查看外网IP curl cip.cc curl ifconfig.me curl ipinfo.io 15. 获取操作系统分支号 hostnamectl
-
LINUX 防火墙开放端口,查看状态,查看开放端口 1.查看防火墙状态:active (running) 即是开启状态systemctl status firewalld查看已开发端口命令:firewall-cmd --list-all新增防火墙开放端口:firewall-cmd --zone=public --add-port=3306/tcp --permanent开放端口后需要重新加载防火墙:firewall-cmd --reloadfirewalld的基本使用命令:启动: systemctl start firewalld 关闭: systemctl stop firewalld 查看状态: systemctl status firewalld 开机禁用 : systemctl disable firewalld 开机启用 : systemctl enable firewalld配置firewalld-cmd命令查看版本: firewall-cmd --version 查看帮助: firewall-cmd --help 显示状态: firewall-cmd --state 查看所有打开的端口: firewall-cmd --zone=public --list-ports 更新防火墙规则: firewall-cmd --reload 查看区域信息: firewall-cmd --get-active-zones 查看指定接口所属区域: firewall-cmd --get-zone-of-interface=eth0 拒绝所有包:firewall-cmd --panic-on 取消拒绝状态: firewall-cmd --panic-off 查看是否拒绝: firewall-cmd --query-panicsystemctl相关命令启动一个服务:systemctl start firewalld.service 关闭一个服务:systemctl stop firewalld.service 重启一个服务:systemctl restart firewalld.service 显示一个服务的状态:systemctl status firewalld.service 在开机时启用一个服务:systemctl enable firewalld.service 在开机时禁用一个服务:systemctl disable firewalld.service 查看服务是否开机启动:systemctl is-enabled firewalld.service 查看已启动的服务列表:systemctl list-unit-files|grep enabled 查看启动失败的服务列表:systemctl --failed
-
【环境安装记录深入学习一:mysql数据库使用移动目录的方式进行迁移】Linux环境MySQL 的迁移(对data目录的直接拷贝) MySQL迁移文档在虚拟机的测试MySQL直接复制data目录方式迁移测试环境服务器A: centos-release-7-8.2003.0.el7.centos.x86_64/MySQL 5.7.32 服务器B: centos-release-7-8.2003.0.el7.centos.x86_64/MySQL 5.7.32迁移步骤停止服务器A和服务器B的MySQL服务systemctl stop mysqld将服务器A的MySQL的data目录从服务器A,除了ib_logfile*外统一复制到服务器B的data目录下可能会报错,可以用cat /var/log/mysqld.log查看日志数据拷贝完成后:##进入到拷贝数据的目录 cd /var/lib/mysql/ ##因为上传的数据拥有者是root,我们需要变更成mysql chown -R mysql.mysql * ##这一步暂定,如果有报错,说无权限,则 chmod -R 777 * ## 配置文件中加上 lower_case_table_names=1 即可。 #是否对sql语句大小写敏感,1表示不敏感 vim /etc/my.cnf #加上这句话 lower_case_table_names=1报错解决办法报错一:mysqld: File '.\binlog.000005' not found (OS errno 2 - No such file or directory) 2022-07-19T01:01:20.153111Z 0 [ERROR] [MY-010958] [Server] Could not open log file. 2022-07-19T01:01:20.154277Z 0 [ERROR] [MY-010041] [Server] Can't init tc log提示找不到 “binlog.000005”文件,由于打不开这个文件,因此启动终止。这个是MySQL运行时使用的二进制日志文件,主要用于记录更改数据的语句,这里由于不知何种原因被删除了,造成MySQL服务无法正常启动。.\binlog.000004 .\binlog.000005解决方案可以看到最后一个文件为“binlog.000005”,解决的办法很简单,就是删除“binlog.index”文件,这样MySQL将默认重建“binlog.000001”二进制日志文件,MySQL服务正常启动!最后的最后systemctl start mysqld
-
windows server2016激活方法+密钥 Windows Server 2016激活方法及密钥激活方法Windows Server 2016的激活方法有多种,包括使用KMS激活、MAK激活、使用激活工具等。使用MAK密钥进行激活以下是使用MAK密钥进行激活的示例:slmgr /skms kms.03k.org slmgr /ipk WC2BQ-8NRM3-FDDYY-2BFGV-KHKQY slmgr /ato在上面的示例中,我们使用slmgr命令行工具来进行激活。首先,我们使用slmgr /ipk命令来安装密钥,然后使用slmgr /ato命令来激活系统。当我们执行这个命令时,会提示激活成功。
-
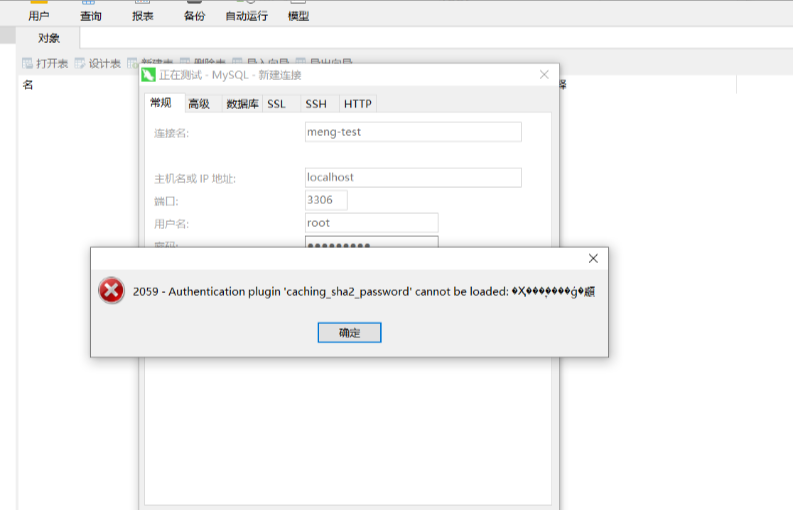
【环境安装记录深入浅出Mysql的2059错误篇】2059-Authentication plugin ‘caching_sha2_password‘ 问题出现的原因及解决方法 2059-Authentication plugin ‘caching_sha2_password‘ cannot be loaded:问题出现的原因及解决方法1.出现原因安装的时候,选择了强加密规则caching_sha2_password,与之前的mysql的mysql_native_password规则不同,navicate驱动目前不支持新加密规则2.解决方法通过更改加密规则和刷新权限的方式mysql -uroot -ppassword #登录 use mysql; #选择数据库 # 远程连接请将'localhost'换成'%' ALTER USER 'root'@'localhost' IDENTIFIED BY 'password' PASSWORD EXPIRE NEVER; #更改加密方式 ALTER USER 'root'@'localhost' IDENTIFIED WITH mysql_native_password BY 'password'; #更新用户密码 FLUSH PRIVILEGES; #刷新权限