
搜索到
17
篇与
的结果
-
 Nginx 下WordPress后台页面混乱 Nginx下wp后台css样式错乱的原因是nginx配置fastcgi_buffers问题引起.最近尝试着用WordPress做个网站,弄完丢到服务器上运行时,发现后台错乱,错位的问题,css样式无法加载. 以为是升级程序出现问题,但恢复备份替换新程序也无法解决,后台检查wordpress mysql数据库也无果,后来发现问题在于:http://luoweihua.cn/wp-admin/load-styles.php?c=1&dir=ltr&load=dashicons,admin-bar,wp-admin,buttons,wp-auth-check&ver=4.1.1 这个url的内容太大,大概有3百多KB,nginx的fcgi buff有限,导致无法正常加载css。解决办法:nginx.conf里server字段内设置,将fastcgi_buffers第二参数设置大于文件大小即可. server字段里面放置:fastcgi_buffers 512 64k;
 -
centos7 Nginx一键安装自动化脚本 离线环境下 centos7 Nginx一键安装自动化脚本本文介绍了一个 Bash 脚本,可用于自动化安装 Nginx 服务器。该脚本简化了安装过程,省去了手动配置的繁琐步骤。脚本功能特点:使用方法:将提供的脚本保存到您的服务器中。使用 root 用户权限运行脚本。如果没有足够权限,脚本将无法执行。根据您的系统环境,确保正确配置以下参数:DEPENDENCY_DIR:Nginx的第三方依赖安装位置。NGINX_PACKAGE:Nginx 的安装包路径。NGINX_INSTALL_DIR:Nginx 的安装目录。NGINX_PID_DIR:Nginx PID 文件存储目录。执行脚本,等待安装过程完成。脚本将输出安装进度和结果信息。安装完成后,您可以使用 nginx -v 命令验证 Nginx 是否成功安装,并使用 systemctl status nginx 命令检查 Nginx 服务的运行状态。安装包网盘下载:Centos7-nginx-1.22.1https://www.alipan.com/s/AukA299pHpM点击链接保存,或者复制本段内容,打开「阿里云盘」APP ,无需下载极速在线查看,视频原画倍速播放。Centos7-nginx-1.22.1完整脚本如下所示: #!/bin/bash # **************************************************************** # * @Title: nginx一键自动安装脚本 # * centos7 环境下Nginx一键安装自动化脚本 # ***************************************************************** set -e # 定义路径 NGINX_PACKAGE="/usr/local/autoinstall/Nginx/lib/nginx-1.22.1.tar.gz" NGINX_INSTALL_DIR="/usr/local/nginx" NGINX_WORKSPACE="/usr/local/nginx/nginx-1.22.1" NGINX_PID_DIR="/usr/local/pid" NGINX_PID_PATH="$NGINX_PID_DIR/nginx.pid" DEPENDENCY_DIR="/usr/local/autoinstall/Nginx/third-lib/" # 必须以 root 用户身份运行 if [[ $EUID -ne 0 ]]; then echo "此脚本必须以 root 用户身份运行" exit 1 fi # 安装依赖 # 安装依赖 echo "正在安装依赖……" yum localinstall -y "$DEPENDENCY_DIR/gcc-c++"/*.rpm yum localinstall -y "$DEPENDENCY_DIR/zlib"/*.rpm yum localinstall -y "$DEPENDENCY_DIR/zlib-devel"/*.rpm yum localinstall -y "$DEPENDENCY_DIR/openssl"/*.rpm yum localinstall -y "$DEPENDENCY_DIR/openssl-devel"/*.rpm # 检查 Nginx 安装包是否存在 if [ ! -f "$NGINX_PACKAGE" ]; then echo "Nginx 安装包不存在。请确保文件存在后,再重新运行此脚本。" exit 1 fi # 创建必要的目录 echo "正在创建必要的目录并设置权限……" mkdir -p /var/log/nginx mkdir -p /var/temp/nginx mkdir -p "$NGINX_INSTALL_DIR" mkdir -p "$NGINX_PID_DIR" chmod 755 /var/log/nginx chmod 755 /var/temp/nginx chmod 755 "$NGINX_INSTALL_DIR" chmod 755 "$NGINX_PID_DIR" # 解压并安装 Nginx echo "正在解压并安装 Nginx……" tar -xf "$NGINX_PACKAGE" -C "$NGINX_INSTALL_DIR" cd "$NGINX_WORKSPACE" ./configure --prefix="$NGINX_INSTALL_DIR" --pid-path="$NGINX_PID_PATH" --lock-path=/var/lock/nginx.lock --error-log-path=/var/log/nginx/error.log --http-log-path=/var/log/nginx/access.log --with-http_gzip_static_module --http-client-body-temp-path=/var/temp/nginx/client --http-proxy-temp-path=/var/temp/nginx/proxy --http-fastcgi-temp-path=/var/temp/nginx/fastcgi --http-uwsgi-temp-path=/var/temp/nginx/uwsgi --http-scgi-temp-path=/var/temp/nginx/scgi --with-http_stub_status_module --with-http_ssl_module --with-file-aio --with-http_realip_module make && make install # 检查 Nginx 是否安装成功 if [ ! -f "$NGINX_INSTALL_DIR/sbin/nginx" ]; then echo "Nginx 安装失败。请检查安装过程,然后再试一次。" exit 1 fi # 将 Nginx 可执行文件添加到系统路径中 echo "将 Nginx 可执行文件添加到 /etc/profile 的系统路径中……" echo "export PATH=\$PATH:$NGINX_INSTALL_DIR/sbin" >> /etc/profile source /etc/profile # 在 Nginx 配置文件中启用 pid echo "更新 Nginx 配置文件以启用 pid……" sed -i "s|#pid.*|pid $NGINX_PID_PATH;|" "$NGINX_INSTALL_DIR/conf/nginx.conf" # 创建 systemd 服务文件 echo "创建 systemd 服务文件……" cat << EOF > /etc/systemd/system/nginx.service [Unit] Description=The Nginx HTTP and reverse proxy server After=network.target remote-fs.target nss-lookup.target [Service] Type=forking PIDFile=$NGINX_PID_PATH ExecStartPre=$NGINX_INSTALL_DIR/sbin/nginx -t -c $NGINX_INSTALL_DIR/conf/nginx.conf ExecStart=$NGINX_INSTALL_DIR/sbin/nginx -c $NGINX_INSTALL_DIR/conf/nginx.conf ExecReload=$NGINX_INSTALL_DIR/sbin/nginx -s reload KillSignal=SIGQUIT TimeoutStopSec=5 KillMode=mixed PrivateTmp=true [Install] WantedBy=multi-user.target EOF # 启动并启用 Nginx 服务 echo "启动并启用 Nginx 服务……" systemctl daemon-reload systemctl start nginx systemctl enable nginx echo "Nginx 已成功安装并启动!"
-
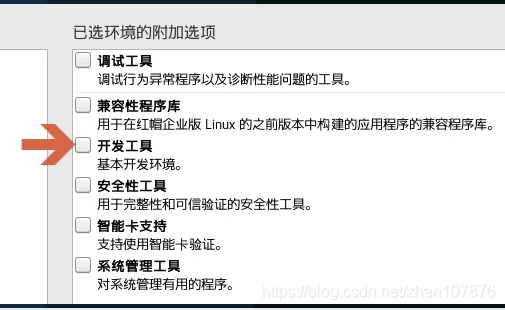
CentOS 7系统离线安装gcc,gcc-c++,vim,perl 背景近段时间需要离线安装 nginx ,发现客户服务器在安装centos的时候没有安装【开发工具】在部署环境,安装操作系统的时候,如果安装了【开发工具】后面会少很多工作,不然后面安装很多软件都会少这少那的报错。联网的还好,不然会增加很多工作量。[blockquote2 name='洛维花']在这里我就遇到了。缺 gcc,gcc-c++,vim,perl[/tip]最终导致安装nginx不成功。于是就去找缺少的离线包前面提到,如果在装系统的时候勾选【开发工具】,系统安装完毕就会有这些工具。也就是说,系统的镜像里边肯定有离线包。其实就是放在Packages目录下,而且都是 rpm格式的软件包,4千多个!!centos7镜像下载>>>现在看看需要的把这些需要的离线包上传到 linux 任意目录下然后依次进入 gcc,gcc+,perl,vim执行安装命令 rpm -Uvh *.rpm --nodeps --force -U:升级软件,若未软件尚未安装,则安装软件。 -v:表示显示详细信息。 -h:以"#"号显示安装进度。 --force:强制安装 --nodeps:不考虑相依属性的关系 拓展知识: rpm 安装软件 无法解决软件包的依赖关系。 yum 命令安装时,自动解决相依性的问题。 本地安装yum 用 yum localinstall -y ./*
-
群晖DSM7.2版本Web Station Nginx 配置的伪静态修改教程 升级后改来改去,我也是累了先进入Web Station Nginx 配置文件目录 cd /var/tmp/nginx/test/plugin_config/sites-enabled/会看到以 webservice_portal_老头后面为字母加数字的文件:webservice_portal_6edc8d4a-2bab-4c89-bc1d-d873ed0e708a我们输出查看 cat webservice_portal_6edc8d4a-2bab-4c89-bc1d-d873ed0e708a sudo -i #提升权限 cd /usr/local/etc/nginx/conf.d cat .service.6edc8d4a-2bab-4c89-bc1d-d873ed0e708a.f7dc2a4d-c44d-47ef-9a49-298f15fc340f.conf mkdir -p f7dc2a4d-c44d-47ef-9a49-298f15fc340f cd f7dc2a4d-c44d-47ef-9a49-298f15fc340f vi user.conf写入wordpress的伪静态配置文件 location / { try_files $uri $uri/ /index.php?$args; } rewrite /wp-admin$ $scheme://$host$uri/ permanent; if (!-e $request_filename) { rewrite (.*) /index.php; }搞定!收尾重新加载nginx服务/bin/nginx -s reload
-
【深度学习KylinOS三】【麒麟系统环境安装之Nginx】安装nginx--银河麒麟V10(Kylin Linux Advanced Server release V10 (Tercel))操作系统 服务器环境在 arm64(aarch64) 架构服务器上基于国产化操作系统安装 Nginx 服务获取源代码软件获取门路:http://nginx.org/download/nginx官网:http://nginx.org/编译前期情况设置履行如下下令,装置依附包。yum install gcc gcc-c++ make unzip pcre pcre-devel zlib zlib-devel libxml2 libxml2-devel readline readline-devel ncurses ncurses-devel perl-devel perl-ExtUtils-Embed openssl-devel -y编译源代码并安装履行以下下令,获取装置包。wget -c http://nginx.org/download/nginx-1.16.1.tar.gz履行以下下令,解压装置包。tar -zxvf nginx-1.16.1.tar.gz履行以下下令,进入装置目次。cd nginx-1.16.1履行以下下令,编译装置nginx。./configure make -j4 && make install测试已实现编译的软件新增nginx用户useradd nginx履行以下下令,给nginx用户开启nginx装置目次权限。chown nginx:nginx /usr/local/nginx履行如下下令,检查nginx版本。cd /usr/local/nginx/sbin/ ./nginx -v启动nginxcd /usr/local/nginx/sbin/ ./nginx检查能否启动胜利ps -ef | grep nginx设置nginx开机自启动进入到/lib/systemd/system/目次cd /lib/systemd/system/创立nginx.service文件,并编纂# vim nginx.service [Unit] Description=nginx After=network.target [Service] Type=forking ExecStart=/usr/local/nginx/sbin/nginx -c conf/nginx.conf ExecReload=/usr/local/nginx/sbin/nginx -s reload ExecStop=/usr/local/nginx/sbin/nginx -s quit PrivateTmp=true [Install] WantedBy=multi-user.target参加开机自启动systemctl enable nginx #假如不想开机自启动了,能够应用上面的下令撤消开机自启动 systemctl disable nginx效劳的启动/结束/革新设置文件/检查状况#systemctl start nginx.service 启动nginx效劳 # systemctl stop nginx.service 结束效劳 # systemctl restart nginx.service 从新启动效劳 # systemctl list-units --type=service 检查全部已启动的效劳 # systemctl status nginx.service 检查效劳以后状况 # systemctl enable nginx.service 设置开机自启动 # systemctl disable nginx.service 结束开机自启动一个罕见的过错Warning: nginx.service changed on disk. Run 'systemctl daemon-reload' to reload units.直接依照提醒履行下令systemctl daemon-reload 即可。systemctl daemon-reload
-
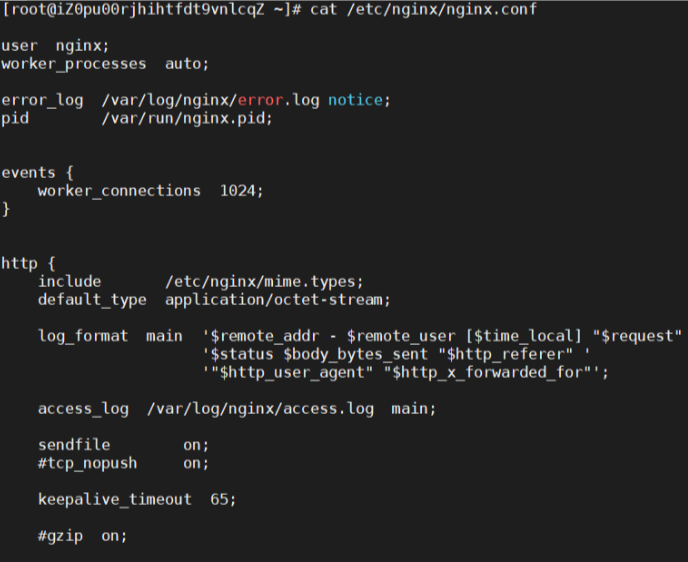
【环境安装记录三】Linux下Yum方式安装Nginx 前言使用Nginx源码进行安装过程比较繁琐,需要提前下载安装GCC编译器、PCRE兼容正则表达式库、zlib压缩库和OpenSSL安全通信的软件库包,然后才能进行Nginx的安装。采用Yum最简单的安装方式能自动解决这些安装依赖,默认情况Centos7中无Nginx的源rpm,需要添加Nginx的源RPM。Linux下Yum安装Nginx添加Nginx源第一种方式: 需要先安装epel-release 因为Nginx并不在官方的yum源中,需要第三方的yum源#我们在Centos下使用yum安装时往往找不到rpm的情况,官方的rpm repository提供的rpm包也不够丰富, #很多时候需要自己编译很痛苦,而EPEL恰恰可以解决这两方面的问题 yum -y install epel-release #更新yum源 yum -y update第二种方式: Nginx官网提供了Centos的源地址,可以如下执行命令添加源rpm -Uvh http://nginx.org/packages/centos/7/noarch/RPMS/nginx-release-centos-7-0.el7.ngx.noarch.rpm安装Nginxyum install -y nginx验证nginx安装是否成功 #查看nginx安装版本,-V可以看到nginx的安装的文件路径 nginx -V # 查看安装的nginx的版本 rpm -qa | grep nginxNginx启动、设置开机自启、查看运行状态、停止命令systemctl start nginx systemctl enable nginx systemctl status nginx systemctl stop nginx相关文件路径①配置文件路径#编辑Nginx配置文件 vi /etc/nginx/nginx.conf #检测配置文件语法是否正确 nginx -t #重新加载Nginx配置 nginx -s reloadNginx默认配置文件(Nginx 1.24.0)②日志路径/var/log/nginx添加开机启动进入系统目录:cd /usr/lib/systemd/system/ 编写nginx.service:vim nginx.service内容如下:Description=nginx - high performance web server After=network.target remote-fs.target nss-lookup.target [Service] Type=forking ExecStart=/usr/local/nginx/sbin/nginx -c /usr/local/nginx/conf/nginx.conf ExecReload=/usr/local/nginx/sbin/nginx -s reload ExecStop=/usr/local/nginx/sbin/nginx -s stop [Install] WantedBy=multi-user.target[blockquote2 name='洛维花']ExecStart、ExecReload、ExecStop需要指定到nginx的实际安装目录[/tip]执行命令:systemctl daemon-reload # 开启自启 systemctl enable nginx.service # 启动、重启、停止 systemctl start|reload|stop nginx
-
-
nginx反向代理配置文件 1.在nginx/conf/nginx.conf中添加:include conf.d/*.conf;2.在同级目录下新建conf.d文件夹,在conf.d文件夹中新建自定义配置文件,如:cms.confupstream cms_server { server localhost:8080; } server { listen 80; server_name www.aa.com; location / { proxy_redirect off; proxy_set_header Host $host; proxy_set_header X-Real-IP $remote_addr; proxy_set_header X-Forwarded-For $proxy_add_x_forwarded_for; proxy_pass http://cms_server; } } server { listen 80; server_name www.bb.com; location / { proxy_redirect off; proxy_set_header Host $host; proxy_set_header X-Real-IP $remote_addr; proxy_set_header X-Forwarded-For $proxy_add_x_forwarded_for; proxy_pass http://cms_server; } } server { listen 80; server_name www.cc.com; location / { proxy_redirect off; proxy_set_header Host $host; proxy_set_header X-Real-IP $remote_addr; proxy_set_header X-Forwarded-For $proxy_add_x_forwarded_for; proxy_pass http://cms_server; } } server { listen 80; server_name www.dd.com; location / { proxy_redirect off; proxy_set_header Host $host; proxy_set_header X-Real-IP $remote_addr; proxy_set_header X-Forwarded-For $proxy_add_x_forwarded_for; proxy_pass http://cms_server; } }