
搜索到
62
篇与
的结果
-
 Docker系列 搭建跨平台自动备份服务duplicati 什么是 Duplicati ?Duplicati 是一个免费的开源备份客户端,可将加密的、增量的、压缩的备份安全地存储在云存储服务和远程文件服务器上。支持 Amazon S3、IDrive e2、Backblaze (B2)、Box、Dropbox、FTP、Google Cloud 和 Drive、HubiC、MEGA、Microsoft Azure 和 OneDrive、Rackspace 云文件、OpenStack Storage (Swift)、Sia、Storj DCS、SSH (SFTP) 、WebDAV、腾讯云对象存储(COS)等!安装在群晖上以 Docker 方式安装。【注意】:强烈不建议用群晖内置的图像方式安装,因为可以选择的源目录比较有限。命令行安装用 docker cli 不仅更快捷,更能方便的指定要备份的源目录# 新建文件夹 duplicati 和 子目录 mkdir -p /volume2/docker/duplicati/{backups,config} # 进入 duplicati 目录 cd /volume2/docker/duplicati # 运行容器 docker run -d \ --restart unless-stopped \ --name=duplicati \ -p 8200:8200 \ -v $(pwd)/config:/config \ -v $(pwd)/backups:/backups \ -v </path/to/source>:/source \ -e PUID=1000 \ -e PGID=1000 \ -e TZ=Asia/Shanghai \ linuxserver/duplicati:latest # 示例(疯子是以 root 身份运行的,并且挂载目录为:root) docker run -d \ --restart unless-stopped \ --name=duplicati \ -p 8200:8200 \ -v $(pwd)/config:/config \ -v $(pwd)/backups:/backups \ -v /root:/source \ -e PUID=0 \ -e PGID=0 \ -e TZ=Asia/Shanghai \ linuxserver/duplicati:latest 关于卷的说明:文件夹装载路径说明docker/duplicati/backups/backups存储本地备份的路径docker/duplicati/config /config 存放设置文件</path/to/source> /source 要备份的文件的源路径因为 Duplicati 采用了 docker 方式部署,所以要把源目录映射到容器中,疯子中老苏把 root’ 作为了源;关于环境变量的说明可变值TZ设为 Asia/ShanghaiPUID设为 0PGID设为 0CLI_ARGSCLI 变量CLI 变量请参考官方文档:https://duplicati.readthedocs.io/en/latest/07-other-command-line-utilities/运行在浏览器中输入 http://群晖IP:8220 就能看到主界面如果你是自己一个人用,选 No ,否则就选 Yes,然后设置一个密码新建一个备份项目如果备份位置疯子的是选择 本地文件夹或磁盘当然也可以选择保存到远端,支持的协议很多疯子选了 Google Drive,备份位置指向了Google Drive测试连接 正常的话,可以进行下一步找到我们之前映射的 source设置备份计划一些常规选项,如果默认的话,文件将按 50M 分割从安全性考虑,建议采用加密到这里任务就建好了!image-1689147720061
 -
pip安装报403错误 解决方法 问题使用清华源(https://pypi.tuna.tsinghua.edu.cn) pip安装报403错误ERROR: HTTP error 403 while getting https://pypi.tuna.tsinghua.edu.cn/packages/16/18/9726cac3c7cb9e5a1ac4523b3e508128136b37aadb3462c857a19318900e/Flask-BasicAuth-0.2.0.tar.gz#sha256=df5ebd489dc0914c224419da059d991eb72988a01cdd4b956d52932ce7d501ff (from https://pypi.tuna.tsinghua.edu.cn/simple/flask-basicauth/) ERROR: Could not install requirement Flask-BasicAuth>=0.2.0 from https://pypi.tuna.tsinghua.edu.cn/packages/16/18/9726cac3c7cb9e5a1ac4523b3e508128136b37aadb3462c857a19318900e/Flask-BasicAuth-0.2.0.tar.gz#sha256=df5ebd489dc0914c224419da059d991eb72988a01cdd4b956d52932ce7d501ff (from locust) because of HTTP error 403 Client Error: Forbidden for url: https://pypi.tuna.tsinghua.edu.cn/packages/16/18/9726cac3c7cb9e5a1ac4523b3e508128136b37aadb3462c857a19318900e/Flask-BasicAuth-0.2.0.tar.gz for URL https://pypi.tuna.tsinghua.edu.cn/packages/16/18/9726cac3c7cb9e5a1ac4523b3e508128136b37aadb3462c857a19318900e/Flask-BasicAuth-0.2.0.tar.gz#sha256=df5ebd489dc0914c224419da059d991eb72988a01cdd4b956d52932ce7d501ff (from https://pypi.tuna.tsinghua.edu.cn/simple/flask-basicauth/)这是因为 PyPI 禁用了对 API 的非 HTTPS 访问https://mail.python.org/pipermail/distutils-sig/2017-October/031712.html解决方法将安装源换成 https://pypi.python.org/simple/pip install xxxx -i https://pypi.python.org/simple/整个docker换源更换docker容器里的pip源。https://www.daimafengzi.ml/archives/166.html
-
【k8s教程二】CentOS7部署K8s集群 [blockquote2 name='洛维花']声明:本教程并不是我原创,因脑子问题,好记性不如笔记以及中途使用中出现其他问题,有个具体化的解决办法,于是便进行了搬运,并稍作更改。文章尾部带有原作者的链接。[/tip]附上原作者的录像环境准备本文服务器的公网IP:192.168.56.101OS version: CentOS 7CPU Architecture: x86_64/amd64K8s version: v1.23.17Docker version: 20.10.23安装依赖yum install -y \ curl \ wget \ systemd \ bash-completion \ lrzsz 安装前准备同步服务器时间timedatectl set-timezone Asia/Shanghai && timedatectl set-local-rtc 0 systemctl restart rsyslog systemctl restart crond修改主机名方便通过主机名访问对于的服务器# 主节点 hostnamectl set-hostname k8s-master # 从节点 hostnamectl set-hostname k8s-node1 hostnamectl set-hostname k8s-node2修改hostscat >/etc/hosts <<EOF 192. 168.56.101 k8s-master 192. 168.56.102 k8s-node1 192. 168.56.103 k8s-node2 EOF开启必要的端口必要端口文档:https://kubernetes.io/zh-cn/docs/reference/networking/ports-and-protocols/因是测试环境,直接关闭防火墙systemctl disable firewalld.service && systemctl stop firewalld.service 容器运行时转发IPv4并让iptables看到桥接流量cat >/etc/modules-load.d/k8s.conf <<EOF overlay br_netfilter EOF modprobe overlay modprobe br_netfilter cat >/etc/sysctl.d/k8s.conf <<EOF net.bridge.bridge-nf-call-iptables=1 net.bridge.bridge-nf-call-ip6tables=1 net.ipv4.ip_forward=1 EOF sysctl --system # 通过运行以下指令确认 br_netfilter 和 overlay 模块被加载 lsmod | egrep 'overlay|br_netfilter' # 通过运行以下指令确认 net.bridge.bridge-nf-call-iptables、net.bridge.bridge-nf-call-ip6tables 系统变量在你的 sysctl 配置中被设置为 1 sysctl net.bridge.bridge-nf-call-iptables net.bridge.bridge-nf-call-ip6tables net.ipv4.ip_forward安装容器运行时[blockquote2 name='洛维花']注意:k8s v1.24及以后不在支持Docker Engine[/tip]安装Docker[blockquote2 name='洛维花']官方文档:https://docs.docker.com/engine/install/centos/[/tip]yum install -y yum-utils # 设置yum阿里云镜像 yum-config-manager --add-repo http://mirrors.aliyun.com/docker-ce/linux/centos/docker-ce.repo mkdir -p /etc/docker # 设置阿里云镜像/日志/cgroup驱动 cat >/etc/docker/daemon.json <<EOF { "exec-opts": ["native.cgroupdriver=systemd"], "log-driver": "json-file", "log-opts": { "max-size": "100m" }, "storage-driver": "overlay2", "storage-opts": [ "overlay2.override_kernel_check=true" ], "registry-mirrors":["https://hub-mirror.c.163.com","https://docker.mirrors.ustc.edu.cn","https://registry.docker-cn.com"] } EOF yum makecache fast yum install -y docker-ce-20.10.23 docker-ce-cli-20.10.23 containerd.io systemctl daemon-reload systemctl enable docker && systemctl restart docker安装containerd(这个其实是另一种的容器工具,我们已经安装了docker,并不需要再安装这个了。)yum install -y yum-utils yum-config-manager --add-repo http://mirrors.aliyun.com/docker-ce/linux/centos/docker-ce.repo yum makecache fast yum install -y containerd.io mkdir -p /etc/containerd 生成默认文件 containerd config default > /etc/containerd/config.toml 编辑配置文件 设置驱动方式为systemd 设置pause镜像 镜像仓库的加速器 sed -i "s#SystemdCgroup = false#SystemdCgroup = true#g" /etc/containerd/config.toml sed -i "s#registry.k8s.io#registry.cn-hangzhou.aliyuncs.com/google_containers#g" /etc/containerd/config.toml sed -i "/\[plugins.\"io.containerd.grpc.v1.cri\".registry.mirrors\]/a\ [plugins.\"io.containerd.grpc.v1.cri\".registry.mirrors.\"docker.io\"]" /etc/containerd/config.toml sed -i "/\[plugins.\"io.containerd.grpc.v1.cri\".registry.mirrors.\"docker.io\"\]/a\ endpoint = [\"https://hub-mirror.c.163.com\",\"https://docker.mirrors.ustc.edu.cn\",\"https://registry.docker-cn.com\"]" /etc/containerd/config.toml sed -i "/endpoint = \[\"https:\/\/hub-mirror.c.163.com\",\"https:\/\/docker.mirrors.ustc.edu.cn\",\"https:\/\/registry.docker-cn.com\"]/a\ [plugins.\"io.containerd.grpc.v1.cri\".registry.mirrors.\"registry.k8s.io\"]" /etc/containerd/config.toml sed -i "/\[plugins.\"io.containerd.grpc.v1.cri\".registry.mirrors.\"registry.k8s.io\"\]/a\ endpoint = [\"registry.cn-hangzhou.aliyuncs.com/google_containers\"]" /etc/containerd/config.toml sed -i "/endpoint = \[\"registry.cn-hangzhou.aliyuncs.com\/google_containers\"]/a\ [plugins.\"io.containerd.grpc.v1.cri\".registry.mirrors.\"k8s.gcr.io\"]" /etc/containerd/config.toml sed -i "/\[plugins.\"io.containerd.grpc.v1.cri\".registry.mirrors.\"k8s.gcr.io\"\]/a\ endpoint = [\"registry.cn-hangzhou.aliyuncs.com/google_containers\"]" /etc/containerd/config.toml systemctl daemon-reload systemctl enable containerd && systemctl restart containerd安装k8s[blockquote2 name='洛维花']官方文档:https://kubernetes.io/zh/docs/reference/setup-tools/kubeadm/kubeadm-init/https://kubernetes.io/zh-cn/docs/reference/command-line-tools-reference/kubelet/[/tip]关闭swap分区或者禁用swap文件swapoff -a && sed -ri 's/.*swap.*/#&/' /etc/fstab关闭selinuxsetenforce 0 && sed -i 's/^SELINUX=enforcing$/SELINUX=permissive/' /etc/selinux/config 安装k8s# 使用阿里云k8s源 cat >/etc/yum.repos.d/kubernetes.repo <<EOF [kubernetes] name=Kubernetes baseurl=https://mirrors.aliyun.com/kubernetes/yum/repos/kubernetes-el7-x86_64/ enabled=1 gpgcheck=0 repo_gpgcheck=0 gpgkey=https://mirrors.aliyun.com/kubernetes/yum/doc/yum-key.gpg https://mirrors.aliyun.com/kubernetes/yum/doc/rpm-package-key.gpg EOF # 安装工具kubelet、kubeadm、kubectl yum install -y kubelet-1.23.17 kubeadm-1.23.17 kubectl-1.23.17 --disableexcludes=kubernetes # 设置驱动方式为systemd cat >/etc/sysconfig/kubelet <<EOF KUBELET_EXTRA_ARGS="--cgroup-driver=systemd" EOF # 设置容器运行时(仅容器运行时为containerd才需要进行以下设置,容器运行时为Docker则不需要) crictl config runtime-endpoint unix:///var/run/containerd/containerd.sock crictl config image-endpoint unix:///var/run/containerd/containerd.sock sed -i '/KUBELET_KUBEADM_ARGS/s/"$/ --container-runtime=remote --container-runtime-endpoint=unix:\/\/\/run\/containerd\/containerd.sock"/' /var/lib/kubelet/kubeadm-flags.env # kubelet开机自启 systemctl enable --now kubelet # 查看kubelet状态 systemctl status kubelet # 如果报错,查询错误信息 journalctl -xe运行k8smkdir -p /k8sdata/log/ kubeadm init \ --apiserver-advertise-address=192.168.56.101 \ --image-repository=registry.cn-hangzhou.aliyuncs.com/google_containers \ --kubernetes-version=v1.23.17 \ --service-cidr=10.96.0.0/12 \ --pod-network-cidr=10.244.0.0/16 | tee /k8sdata/log/kubeadm-init.log mkdir -p "$HOME"/.kube cp -i /etc/kubernetes/admin.conf "$HOME"/.kube/config chown "$(id -u)":"$(id -g)" "$HOME"/.kube/config提示:[blockquote2 name='洛维花']如果是搭建的服务器是主节点,则服务器至少2核2G,如果没有达到该配置但是仍想安装,则可以在kubeadm init命令行中使用–ignore-preflight-errors=CpuNum即可忽略报错。如果初始化失败,通过kubeadm reset进行重设[/tip]安装网络系统flannelmkdir -p /k8sdata/network/ wget --no-check-certificate -O /k8sdata/network/flannelkube-flannel.yml https://raw.githubusercontent.com/coreos/flannel/master/Documentation/kube-flannel.yml kubectl create -f /k8sdata/network/flannelkube-flannel.ymlcalicomkdir -p /k8sdata/network/ wget --no-check-certificate -O /k8sdata/network/calico.yml https://docs.projectcalico.org/manifests/calico.yaml kubectl create -f /k8sdata/network/calico.ymlk8s命令行补全! grep -q kubectl "$HOME/.bashrc" && echo "source /usr/share/bash-completion/bash_completion" >>"$HOME/.bashrc" ! grep -q kubectl "$HOME/.bashrc" && echo "source >"$HOME/.bashrc" ! grep -q kubeadm "$HOME/.bashrc" && echo "source >"$HOME/.bashrc" ! grep -q crictl "$HOME/.bashrc" && echo "source >"$HOME/.bashrc" source "$HOME/.bashrc"k8s常用命令# 获取节点 kubectl get nodes -o wide # 实时查询nodes状态 watch kubectl get nodes -o wide # 获取pod kubectl get pods --all-namespaces -o wide # 查看镜像列表 kubeadm config images list # 节点加入集群 kubeadm token create --print-join-command # 描述node kubectl describe node k8s-master # 描述pod kubectl describe pod kube-flannel-ds-hs8bq --namespace=kube-flannel总结按照本教程可以部署一个可以正常运行的k8s,但本文仍存在一些待优化的地方,如在部署或者使用过程中遇到问题会在本文进行补充。视频备份{cloud title="百度网盘" type="bd" url="https://pan.baidu.com/s/1CiVD7Vn1IVxEHcqQ3iflfA?pwd=vb79" password=""/}[blockquote2 name='洛维花']原文链接:https://jonssonyan.com/2022/07/18/CentOS7%E9%83%A8%E7%BD%B2K8s%E9%9B%86%E7%BE%A4/[/tip]
-
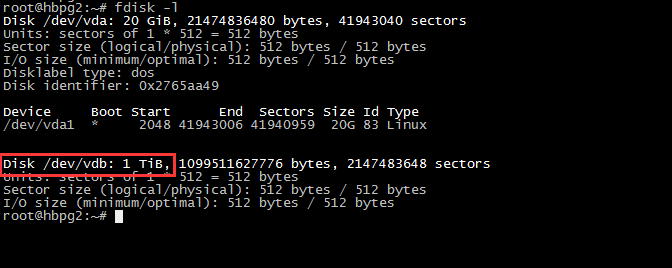
梅林、padavan、LEDE(openwrt)怎么格式化U盘?梅林、padavan、LEDE(openwrt)路由器格式化U盘、硬盘 本教程适用于梅林、padavan、LEDE(OpenWRT)等固件以下具体方法都基于 ext4,NTFS 相关错误不做回答使用ssh连接路由器,把硬盘插到路由器上我们需要在命令行进行以下4步操作:梅林、padavan、LEDE(openwrt)安装fdisk一般梅林、Padavan 固件都会自带的,不用安装,如果没有则按照下面给出的命令opkg update opkg install fdisk输出Configuring fdisk. 并且没有错误,fdisk就安装好了查看你的设备fdisk -l这里先输出系统分区之类的不用管,外置设备一般在最后Disk /dev/sda: 30.7 GB, 30752000000 bytes 这里要注意/dev/sda是设备 64 heads, 32 sectors/track, 29327 cylinders Units = cylinders of 2048 * 512 = 1048576 bytes Device Boot Start End Blocks Id System /dev/sda1 2 29327 30029824 83 Linux 这里的/dev/sda1是设备里面的分区,一定要分清楚 上面的信息注意看到和你的存储大小一样的设备,我的是 /dev/sda,在它里面有个 /dev/sda1的分区删除分区、新建分区先卸载 硬 盘,如果提示 No such file or directory 没关系,说明本来就没挂载上padavan、梅林可以执行以下这个退出usbejusb其他固件,或者梅林使用以上命令无效,则可以使用这个命令卸载分区umount /dev/sda1然后分区fdisk /dev/sda # 注意这里的设备和分区一定要分清,这里填写设备也就是“/dev/sda”首先使用fdisk -l 发现待分区磁盘/dev/sda 大小为1TBfdisk /dev/vdb 对该磁盘进行分区,输入m并回车输入n并回车,n是“new”新建分区的意思出现两个菜单e表示扩展分区,p表示主分区,按"p"键出现提示:"Partition number (1-4): "选择主分区号直接按回车表示1柱面开始分区,提示最后一个柱面或大小。输入+500G 按回车,表示第一个分区为500G空间(采用默认值一直回车会将整个1TB都分给/dev/sda1)输入 w 并回车,意思是对刚才的结果进行保存,新建第二块分区(/dev/sda)时候,记得也选择p。执行命令,查看设备fdisk -l找到你的设备 可以看到ID为83就对了格式化分区分区已经有了,现在开始格式化用 mkfs.ext4 命令格式化,并且设置卷标为 onmp[blockquote2 name='洛维花']注意,如果下面的命令提示 /dev/sda1 is mounted ,则需要先卸载 硬 盘,和分区前卸载的方法一样[/tip]mkfs.ext4 -m 0 -L onmp /dev/sda1如果你的硬盘比较大,256G以上的话,是下面这个命令:mkfs.ext4 -m 0 -L ONMP -T largefile /dev/sda1mke2fs 1.42.8 (20-Jun-2013) Filesystem label=onmp OS type: Linux Block size=4096 (log=2) Fragment size=4096 (log=2) Stride=0 blocks, Stripe width=0 blocks 1880480 inodes, 7507456 blocks 0 blocks (0.00%) reserved for the super user First data block=0 Maximum filesystem blocks=0 230 block groups 32768 blocks per group, 32768 fragments per group 8176 inodes per group Superblock backups stored on blocks: 32768, 98304, 163840, 229376, 294912, 819200, 884736, 1605632, 2654208, 4096000 Allocating group tables: done Writing inode tables: done Creating journal (32768 blocks): done Writing superblocks and filesystem accounting information: done这样,硬盘就被格式化完了,拔插 硬 盘可以重新挂载,或者你想用以下命令挂载也行。mkdir /mnt/onmp mount -t ext4 /dev/sda1 /mnt/onmp
-
-
更换docker容器里的pip源。 先进入容器docker ps docker exec -it 容器ID /bin/bash更换源pip config set global.index-url https://mirrors.aliyun.com/pypi/simple # 永久配置国内镜像源 pip config list国内源列表国内镜像源: 清华: https://pypi.tuna.tsinghua.edu.cn/simple 阿里云: http://mirrors.aliyun.com/pypi/simple/ 中国科技大学: https://pypi.mirrors.ustc.edu.cn/simple/ 华中理工大学: http://pypi.hustunique.com/ 山东理工大学: http://pypi.sdutlinux.org/ 豆瓣: http://pypi.douban.com/simple/