
搜索到
87
篇与
的结果
-
 【环境安装记录一】Linux 使用yum命令安装mysql 【安装步骤】查看有没有安装包[root@localhost ~]#yum list mysql*安装mysql客户端[root@localhost ~]#yum install mysql安装mysql服务端[blockquote2 name='洛维花']提示:如果输入此命令没有报错,则跳过下面步骤,继续安装下一个服务端[/tip][root@localhost ~]#yum install mysql-server[blockquote2 name='洛维花']注意:此处错误提示为安装失败。原因:CentOS7自带有MariaDB而不是MySQL,MariaDB和MySQL一样也是开元的数据库解决方案:如果必须要安装MySQL,首先必须添加mysql社区repo通过输入命令:(权限不够,自行加入sudo)[/tip]rpm -Uvh http://dev.mysql.com/get/mysql-community-release-el7-5.noarch.rpm执行完后,则继续执行:[root@localhost ~]#yum install mysql-devel到此mysql数据库安装完成了,接下来需要对数据库进行一些简单配置简单配置在/etc/my.cnf 文件中加入默认字符集[root@localhost ~]#vim /etc/my.cnf ##添加元素 collation-server = utf8_general_ci init-connect='SET NAMES utf8' character-set-server = utf8启动或关闭mysql服务[root@localhost ~]#service mysqld start --启动mysql [root@localhost ~]#service mysqld stop --关闭mysql· [root@localhost ~]#lsof -i:3306 --数据库端口是否开启设置开机启动mysql服务方式一进入系统目录:cd /usr/lib/systemd/system/编写mysqld.service:vim mysql.service内容如下:[Unit] Description=MySQL Community Server After=network.target After=syslog.target [Install] WantedBy=multi-user.target Alias=mysql.service [Service] User=mysql Group=mysql # Execute pre and post scripts as root PermissionsStartOnly=true # Needed to create system tables etc. ExecStartPre=/usr/bin/mysql-systemd-start pre # Start main service ExecStart=/usr/bin/mysqld_safe --basedir=/usr # Don't signal startup success before a ping works ExecStartPost=/usr/bin/mysql-systemd-start post # Give up if ping don't get an answer TimeoutSec=600 Restart=always PrivateTmp=false[blockquote2 name='洛维花']各大路劲需要指定到Mysql的实际安装目录[/tip]执行命令:systemctl daemon-reload # 开启自启 systemctl enable mysqld.service # 启动、重启、停止 systemctl start|reload|stop mysql 设置开机启动mysql服务方式二[root@localhost ~]# chkconfig --add mysqld设置开机启动报错内容开机启动报错内容[root@localhost ~]# chkconfig --add mysqld 服务 mysqld 信息读取出错:没有那个文件或目录解决设置开机启动报错查找Mysql 安装目录###默认安装路径 mysql_config --variable=pkglibdir ###MySQL的数据目录路径 mysql_config --variable=datadir ###默认配置文件路径 mysql_config --variable=confdir ###查看Mysql状态 systemctl status mysql找到图片上的mysqld.server服务文件复制到/etc/rc.d/init.d下cp /usr/lib/systemd/system/mysqld.service /etc/rc.d/init.d/mysqld chmod +x /etc/rc.d/init.d/mysqld 然后执行chkconfig --add mysqld时提示“服务 mysql 不支持 chkconfig,解决办法要让chkconfig支持,就得在/etc/rc.d/init.d/mysqld脚本中添加 两行注释:# chkconfig: 234 19 08 # description: xxxxxxxxxxxxxxxxx设置权限并添加开机启动:##设置权限 chmod +x /etc/init.d/mysqld ##添加开机启动 chkconfig --add mysqld创建root管理员mysqladmin -u root password 密码进入mysql容器中mysql -u root -p设置允许远程访问开放防火墙的端口号mysql增加权限:mysql库中的user表新增一条记录host为“%”,user为“root”。use mysql; UPDATE user SET `Host` = '%' WHERE `User` = 'root' LIMIT 1; ##%表示允许所有的ip访问 select host from user;开放防火墙端口,允许外部访问版本的问题,两种方式方式一systemctl status iptables.service ####如果报错,则看方式二 Unit iptables.service could not be founda、修改防火墙配置vi /etc/sysconfig/iptables 加入:-A INPUT -p tcp -m tcp --dport 3306 -j ACCEPT 这段配置,然后进行保存iptables基本命令systemctl restart iptables.service -- 重启防火墙 systemctl status iptables.service -- 查看状态 service iptables save -- 保存规则 systemctl enable iptables.service -- 设置开机启动 systemctl start iptables.service -- 开启服务方式二查看防火墙状态systemctl status firewalld.service开放端口firewall-cmd --zone=public --add-port=3306/tcp --permanent ##重启防火墙 systemctl restart firewalld.service[blockquote2 name='洛维花']注意:如果用的是阿里云服务器,需要配置安全组规则,否则无法访问[/tip]测试远程访问我用的是navicat客户端进行连接,如果弹出该提示框,则表示连接成功!到此结束!
 -
【基础学习KylinOS二】Esxi上基础安装篇---银河麒麟KylinOS-V10(SP3)高级服务器操作系统 前言简述本文主要讲解KylinOS(银河麒麟)基础知识,与实践在VMware ESXi(可直接安装到您的物理服务器的、可靠的裸机 Hypervisor)安装和使用国产的操作系统 KylinOS(银河麒麟)高级服务器操作系统 V10 SP3 Lance 流程,帮助各位小伙伴从国产服务器入门到放弃…呸…,是支持国产系统,当前国产系统是趋势(国家要求),由于单位要试用麒麟v10服务器操作系统验证其是否能承载当前业务,作为一名IT搬砖打工人肯定是积极响应,首当其冲,鞍前马后。才有了此文,此篇文章作为银河麒麟入门实践章节,后续会将在运维或者K8S集群中遇到的问题进行整理出来,减少后续伙伴入坑和出坑。产品版本当前银河麒麟主要是桌面操作系统(Desktop operating System) 和 服务器操作系统(Server operating System) 两大操作系统,此处主要介绍银河麒麟高级服务器操作系统V10相关信息。银河麒麟现阶段提供的产品:银河麒麟桌面操作系统V4银河麒麟桌面操作系统V10银河麒麟服务器操作系统V4银河麒麟高级服务器操作系统V10 (主流,目前是SP3版本) :https://www.kylinos.cn/scheme/server/1.html银河麒麟服务器操作系统2.0 (已过时,丢弃)中标麒麟提供:中标麒麟高级服务器操作系统软件V7.0中标麒麟安全操作系统软件V7.0中标麒麟桌面操作系统软件V7.0银河麒麟高级服务器操作系统V10 特点[blockquote2 name='洛维花']同源构建: 支持六款自主CPU平台(飞腾、鲲鹏、龙芯、申威、海光、兆芯等国产CPU),所有组件基于同一套源代码构建。自主CPU平台深入优化: 针对不同自主CPU平台在内核层、RAS特性、I/O性能、虚拟化和国产硬件(桥片、网卡、显卡、Al卡、加速卡等)及驱动支持等方面优化增强,以及工控机支持。虚拟化及云原生支持: 实现QAS、EDT网络带宽分级管控,优化支持KVM、Docker、LXC等虚拟化,以及Ceph、GlusterFS、OpenStack、k8s等原生技术生态,实现对容器、虚拟化、云平台、大数据等云原生应用的良好支持。高可用性: 通过XFS文件系统、备份恢复、网卡绑定、硬件冗余等技术和配套的麒麟高可用集群软件,做到系统可靠、数据可靠、应用可靠,确保集群或单系统上关键业务、核心应用的稳定性和可靠性。可管理性: 提供图形化管理工具和统一的管理平台,实现对物理服务器集群运行状态的监控及预警、对虚拟化集群的配置及管控、对高可用集群的策略定制和资源调配等功能。内生本质安全: 构建基于自主软硬件和密码技术的内核与应用一体化的内生本质安全体系。[/tip]银河麒麟高级服务器操作系统V10与其他配套扩展软件共同服务传统业务应用、系统迁移、云计算、大数据、高可用、虚拟化、人工智能7大场景,为用户上云提供底座支撑,协助企业数字化转型。银河麒麟高级服务器操作系统V10 生态环境从基础设施到云计算,再到数据支撑以及AI大数据和应用服务。官方参考官网地址: https://www.kylinos.cn试用下载: https://www.kylinos.cn/support/trial.htmlB站官方: https://space.bilibili.com/2055926626常见问题: https://www.kylinos.cn/support/problem.html体验社区版本openKylin :https://www.openkylin.top系统安装镜像下载麒麟软件官方提供了银河麒麟操作系统免费试用以及openKylin社区版本下载,此处由于我们是要使用银河麒麟操作系统V10 SP3,所以我们需要申请下载。首先我们打开浏览器访问 https://www.kylinos.cn/support/trial.html 地址,填上对应信息后提交。提交成功会转到下载页面,根据CPU架构(AMD、Intel)选择要下载银河麒麟高级服务器操作系统V10安装包,此处由于我服务器机器的CPU是Intel的,所以可以选择兼容版本,此处我下载的ISO文件为 Kylin-Server-V10-SP3-General-Release-2212-X86_64。[blockquote2 name='洛维花']温馨提示: 上述试用版本会不定期更新,所以你下载的可能与我的ISO文件不一致,这是正常的。[/tip]除此之外,如果你还嫌麻烦,我们还可以通过【双源飞流下载站】(https://sx.ygwid.cn:4431/) 进行下载对应的银河麒麟版本,注意 MD5 校验哟!安装流程在 VMware ESXI 上安装银河麒麟高级服务器操作系统V10 SP3 实践登录 VMware® vSphere® vCneter 管理端界面显示如下所示,我们右键选中ESXI机器,然后新建虚拟机->【创建新虚拟机】-> 设置新虚拟机名称并选择虚拟机计算资源节点, 最后再点击【NEXT】进入数据存储选择进入到【配置文件和磁盘文件的存储】选择ESXI中挂载的数据磁盘(本地或者网络磁盘),下一步进入兼容性选择,通常建议 6.7以及更高版本,下一步进入到客户机操作系统的选择,此处设置的是Linux 和 其他 4.x 或更高版本的 Linux (64 位)选项。进入到【配置虚拟机硬件】界面,此处笔者配置 8 CPU 、32GB 内存、256GB 磁盘,配置好虚拟机网络,其他默认即可,在选中新的 CD/DVD 驱动器 -> 【数据存储ISO文件】此处我已经将ISO上传到挂载到ESXI的NFS服务器上-> 【浏览】-> 选择 NFS-ISO 上的 Kylin Server 镜像文件 -> 将状态勾选【打开电源时连接】重要 -> 点击【确定】。点击【Next】即将完成,你可以点击是否启动该虚拟机,此处我们先不启动,点击完成,回到 vCenter 主界面,点击该虚拟机选项卡中操作 -> 【启动】-> 【打开电源】-> 为了防止使用Web控制台会出现大小写异常,此处建议启动后使用 VMware Remote Console 软件进行链接,启动机器后便可直接引导进入挂载的ISO系统安装选项界面。使用方向键选择 “Install Kylin Linux Advanced Server V10” (白行为选中), 回车即可进入安装流程。进入【欢迎使用 Kylin Linux Advanced Server V10】界面,默认采用【简体中文】,点击 【继续】或者 Alt+C键进入到安装信息摘要。进入【安装信息摘要】界面, 该页面配置所有与安装相关的信息,点击相应配置项的图标进入配置页面,需要注意的是【软件】和【系统】以及【用户设置】配置。点击 【软件选择】,此处需要根据不同业务系统环境需求进行服务器的安装,默认选项是【带UKUI GUI 的服务器】,但是通常来说建议选择【最小安装】(一是安装速度快,二是防止过多的安装软件占用系统空间),例如博主在安装系统时选择最小安装附加软件如下图所示,选择后点击【完成】返回上一界面。点击 【安装目的地】,此处是配置安装磁盘及分区,如果您使用的是全新的磁盘并且希望使用全部磁盘空间,可以使用默认的自动分区配置,直接点击【完成】返回【安装信息摘要】页面即可,但是对于机房线上的服务器来说,通常是需要自定义的,此处我们选择需要安装系统的本地磁盘(256GB)的,然后在存储配置点击【自定义】,再点击【完成】进入下一界面此时进入到手动分区页面,点击【这里自动创建它们】LVM 逻辑卷点击后将会出现如下界面,此时我们可以根据需求来修改各分区挂载点的大小。PS: 下面是在传统启动(Legacy 英 / ˈleɡəsi)模式下的分区配置,配置好之后点击 【完成】# 分区配置(建议) / 根分区 50G及以上 /home 用户家数据分区 50G及以上 /boot boot分区 2G /swap swap分区 若机器内存小于2G则建议配置,通常服务器内存都比较大所以无需配置交换分区,但你是可以划分一定磁盘空间给它,先将其禁用等待需要使用时将其启用,如下所示我划分4个G PS: 分区格式建议设置为 xfs 即可,当然也可以设置为 ext4 格式。 知识扩展: linux中xfs和ext4有什么区别? > 1、单个文件的大小,EXT4可以是16GB到16TB,而XFS可以是16TB到16EB; > 2、最大文件系统大小,EXT4可以是1EB,而XFS是8EB; > 3、EXT4受限制于磁盘结构和兼容问题,可扩展性和scalability不如XFS。 > 4、在4K数量级上随机写XFS略好于EXT4。然后将会出现如下图所示界面,我们点击【接受更改】即可,将会把分区信息写入磁盘中,等待片刻,将会回到主界面下面再进行【网络和主机名】配置,此处我将机器名称设置为 kylinos ,点击【配置】,将其测试网卡地址设置为 192.168.10.210 ,设置后点击【完成】即可。然后再进行root用户和普通用户账号密码设置,PS: 请注意密码强弱要求,并且root密码不能与普通管理员密码一致,单击【完成】回到主界面。在进行前面的操作后,通常会出现如下页面,我们点击【开始安装】即可开始系统了。[blockquote2 name='洛维花']温馨提示: 安装程序会自动检测各个配置项;如果检测存在无法确认或不正确配置项,相应配置项的图标上会显示感叹号。[/tip]此处等待10来分钟的样子即可安装成功,然后点击如图中所示的【重启系统】按钮即可。系统重启之后,将会出现如下图所示的界面,需要你 acceept 允许许可以及网络配置,你需要输入指定项目名称以及提示信息进行设置即可。 PS: 若不想进行网络配置可以输入q 然后按照提示输入 yes 即可回到系统的登录界面。此时你将使用刚才设置的root用户或者kylin用户的密码进行登录到麒麟服务器中,可以执行如下命令查看系统相关信息# 系统版本 cat /etc/os-release # 内存信息 lsmem # CPU 信息 lscpu # 磁盘分区信息 lsblk至此,在VMware ESXI 上安装国产化 KylinOS 系统实践完毕,关注我,尽情期待后续银河麒麟系统的安全加固脚本以及视频的发布。
-
systemd服务 前言systemd 是一个系统和服务管理器,用于在 Linux 操作系统中启动、停止和管理系统进程和服务。它被广泛用于现代的 Linux 发行版中。以下是一些常用的 systemd 命令和示例:1.启动、停止或重启某个服务:启动服务:systemctl start 服务名 停止服务:systemctl stop 服务名 重启服务:systemctl restart 服务名例如,启动 Apache 服务:systemctl start apache22.查看服务状态:查看某个服务的状态:systemctl status 服务名 查看所有服务的状态:systemctl status例如,查看网络管理服务(NetworkManager)的状态:systemctl status NetworkManager3.设置服务开机自启动:开启服务自启动:systemctl enable 服务名 关闭服务自启动:systemctl disable 服务名例如,设置 Nginx 服务开机自启动:systemctl enable nginx4.查看服务的详细信息和配置:查看某个服务的所有信息:systemctl show 服务名 查看某个服务的具体配置文件路径:systemctl show -p FragmentPath 服务名例如,查看 MySQL 服务的详细信息:systemctl show mysql5.显示服务日志:显示某个服务的日志:journalctl -u 服务名 显示所有服务的日志:journalctl例如,显示 Syslog 服务的日志:journalctl -u syslog此外,systemd 的配置文件一般位于 /etc/systemd/ 目录下,可以根据需要修改相关配置。
-
qbittorrent搜索在线插件 https://raw.githubusercontent.com/khensolomon/leyts/master/yts.py https://raw.githubusercontent.com/solenskiner/search-plugins/master/nova3/engines/academictorrents.py https://raw.githubusercontent.com/hannsen/qbittorrent_search_plugins/master/ali213.py https://raw.githubusercontent.com/hannsen/qbittorrent_search_plugins/master/threedm.py https://raw.githubusercontent.com/lima66/Torrents_Plugin/master/btetree.py https://raw.githubusercontent.com/MaurizioRicci/qBittorrent_search_engine/master/cinecalidad.py https://raw.githubusercontent.com/davy39/qbfrench/master/cpasbien.py https://raw.githubusercontent.com/hannsen/qbittorrent_search_plugins/master/demonoid.py https://github.com/xyauhideto/DMHY_qBittorrent_search_plugin/raw/master/dmhyorg.py https://raw.githubusercontent.com/MaurizioRicci/qBittorrent_search_engine/master/ettv.py https://raw.githubusercontent.com/MaurizioRicci/qBittorrent_search_engine/master/extratorrent.py https://raw.githubusercontent.com/nindogo/qbtSearchScripts/master/idope.py https://raw.githubusercontent.com/MaurizioRicci/qBittorrent_search_engine/master/corsaroblu.py https://raw.githubusercontent.com/MaurizioRicci/qBittorrent_search_engine/master/corsaronero.py https://raw.githubusercontent.com/MaurizioRicci/qBittorrent_search_engine/master/kickass_torrent.py https://raw.githubusercontent.com/MadeOfMagicAndWires/qBit-plugins/6074a7cccb90dfd5c81b7eaddd3138adec7f3377/engines/linuxtracker.py https://raw.githubusercontent.com/nindogo/qbtSearchScripts/master/magnetdl.py https://raw.githubusercontent.com/MaurizioRicci/qBittorrent_search_engine/master/mejor.py https://raw.githubusercontent.com/nindogo/qbtSearchScripts/master/mkvcage.py https://raw.githubusercontent.com/4chenz/pantsu-plugin/master/pantsu.py https://raw.githubusercontent.com/MadeOfMagicAndWires/qBit-plugins/master/engines/nyaapantsu.py https://raw.githubusercontent.com/MadeOfMagicAndWires/qBit-plugins/master/engines/nyaasi.py https://raw.githubusercontent.com/Pireo/hello-world/master/rockbox.py https://raw.githubusercontent.com/Pireo/hello-world/master/rutor.py https://gist.githubusercontent.com/kernc/67c939c57edb7dd057b3abf9f159598a/raw/09c0099fc8cd8bd2326e5881a8f77c2dffb8e16b/skytorrents.py https://raw.githubusercontent.com/hannsen/qbittorrent_search_plugins/master/smallgames.py https://raw.githubusercontent.com/gitDew/qbittorrent-snowfl-search-plugin/master/snowfl.py https://raw.githubusercontent.com/MaurizioRicci/qBittorrent_search_engine/master/solotorrent.py https://raw.githubusercontent.com/phuongtailtranminh/qBittorrent-Nyaa-Search-Plugin/master/nyaa.py https://raw.githubusercontent.com/4chenz/pantsu-plugin/master/sukebei.py https://raw.githubusercontent.com/ngosang/qBittorrent-plugins/master/sumotorrent/sumotorrent.py https://raw.githubusercontent.com/ngosang/qBittorrent-plugins/master/tntvillage/tntvillage.py https://raw.githubusercontent.com/BrunoReX/qBittorrent-Search-Plugin-TokyoToshokan/master/tokyotoshokan.py https://raw.githubusercontent.com/CravateRouge/qBittorrentSearchPlugins/master/torrent9.py https://raw.githubusercontent.com/MaurizioRicci/qBittorrent_search_engine/master/torrentfunk.py https://raw.githubusercontent.com/nindogo/qbtSearchScripts/master/uniondht.py https://raw.githubusercontent.com/nindogo/qbtSearchScripts/master/yourbittorrent.py https://raw.githubusercontent.com/MadeOfMagicAndWires/qBit-plugins/master/engines/bakabt.py https://raw.githubusercontent.com/adrianmocan/qbittorrent_plugin_filelist.ro/master/filelist_ro/filelist.py https://raw.githubusercontent.com/hannsen/qbittorrent_search_plugins/master/jackett.py https://raw.githubusercontent.com/Skymirrh/qBittorrent-rutracker-plugin/master/rutracker.py https://raw.githubusercontent.com/alvin1979/qbrutracker/master/qbrutracker.py https://raw.githubusercontent.com/CravateRouge/qBittorrentSearchPlugins/master/yggtorrent.py
-
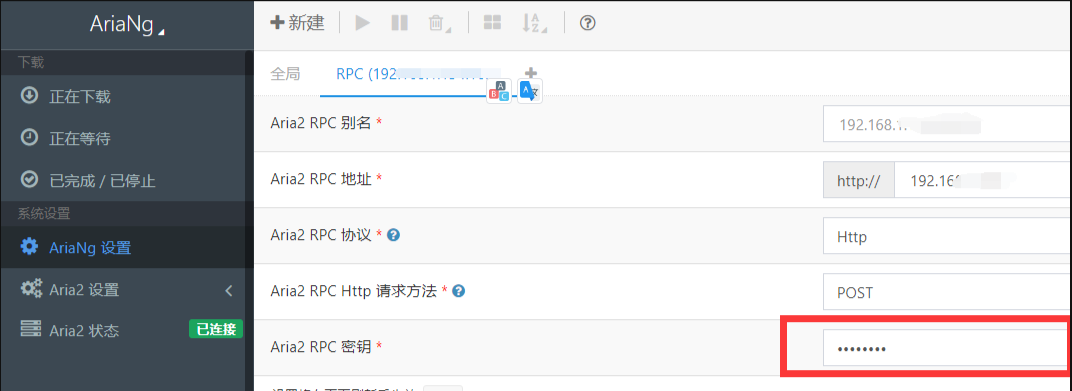
【N1和Armbian】八、Docker安装aria2+ariang 1、拉取aria2镜像docker pull p3terx/aria2-pro:latest2、启动镜像docker run -d \ --name aria2-pro \ --restart unless-stopped \ --log-opt max-size=1m \ -e PUID=$UID \ -e PGID=$GID \ -e UMASK_SET=022 \ -e RPC_SECRET=daimafengzi \ -e RPC_PORT=6800 \ -p 6800:6800 \ -e LISTEN_PORT=6888 \ -p 6888:6888 \ -p 6888:6888/udp \ -v /mnt/H1/aria2-config:/config \ -v /mnt/H1/media:/Download \ --restart=always \ p3terx/aria2-pro3、拉取AriaNg镜像docker pull p3terx/ariang:latest4、启动镜像docker run -d \ --name AiraNg \ --log-opt max-size=1m \ --restart=always \ -p 16880:6880 \ p3terx/ariang:latest5、配置RPC(登录http://IP:16880)修改成相应数据,密钥为自己设置的 prc_password
-
Linux软件未完全安装带来的问题及解决方案 Linux软件未完全安装带来的问题及解决方案–E: Unmet dependencies. Try ‘apt --fix-broken install’ with no packages (or specify a solution). _最近使用Debian搭建CS服务器,安装各种命令包遇见一些问题,一般是依赖错误、安装目录已存在其他文件(可能是同类的命令包存放相同位置导致的)环境:root@armbian:~# lsb_release -a No LSB modules are available. Distributor ID: Ubuntu Description: Armbian 23.08.0-trunk lunar Release: 23.04 Codename: lunar个人遐想我遇到的问题是为python3环境安装pip3产生的报错,当时我想了一个暴力的解决方法,直接下载pip安装包本地解压安装,当时解决了这个问题 ,但是我再装别的命令包就会有以下报错:The following packages have unmet dependencies: bsdmainutils : Depends: bsdextrautils (>= 2.35.2-7) but it is not going to be installed E: Unmet dependencies. Try 'apt --fix-broken install' with no packages (or specify a solution).dpkg: error processing archive /var/cache/apt/archives/bsdextrautils_2.36-3+b1_amd64.deb (--unpack): trying to overwrite '/usr/share/bash-completion/completions/hexdump', which is also in package bash-completion 1:2.1-4.3结合这篇文章大体明白了自己的问题可能就是之前装bsdmainutils命令包没装完,存在目录上的一些问题:然后使用文章中的方法步骤,找到出错的命令包位置,使用以下指令:root@fish2:~# dpkg -i --force-overwrite /var/cache/apt/archives/bsdextrautils_2.36-3+b1_amd64.deb (Reading database ... 117779 files and directories currently installed.) Preparing to unpack .../bsdextrautils_2.36-3+b1_amd64.deb ... Unpacking bsdextrautils (2.36-3+b1) ... dpkg: warning: overriding problem because --force enabled: //警告无报错 dpkg: warning: trying to overwrite '/usr/share/bash-completion/completions/hexdump', which is also in package bash-completion 1:2.1-4.3 dpkg: warning: overriding problem because --force enabled: dpkg: warning: trying to overwrite '/usr/share/bash-completion/completions/look', which is also in package bash-completion 1:2.1-4.3 Setting up bsdextrautils (2.36-3+b1) ... update-alternatives: warning: alternative /usr/bin/bsd-write (part of link group write) doesn't exist; removing from list of alternatives update-alternatives: warning: /etc/alternatives/write is dangling; it will be updated with best choice update-alternatives: using /usr/bin/write.ul to provide /usr/bin/write (write) in auto mode接着这样:root@fish2:~# apt-get install -f Reading package lists... Done Building dependency tree Reading state information... Done The following packages were automatically installed and are no longer required: libdrm-amdgpu1 libdrm-intel1 libdrm-nouveau2 libdrm-radeon1 libisl22 libllvm3.9 libpciaccess0 libruby2.3 libtxc-dxtn-s2tc libzstd1 ruby-did-you-mean ruby2.3 Use 'apt autoremove' to remove them. 0 upgraded, 0 newly installed, 0 to remove and 588 not upgraded. 8 not fully installed or removed. After this operation, 0 B of additional disk space will be used. apt-listchanges: Can't set locale; make sure $LC_* and $LANG are correct! perl: warning: Setting locale failed. perl: warning: Please check that your locale settings: LANGUAGE = (unset), LC_ALL = (unset), LANG = "zh_CN.UTF-8" are supported and installed on your system. perl: warning: Falling back to the standard locale ("C"). locale: Cannot set LC_CTYPE to default locale: No such file or directory locale: Cannot set LC_MESSAGES to default locale: No such file or directory locale: Cannot set LC_ALL to default locale: No such file or directory Processing triggers for cracklib-runtime (2.9.2-5) ... Setting up libmpfr6:amd64 (4.1.0-3) ... Setting up libzstd1:amd64 (1.4.5+dfsg-4) ... Setting up ncal (12.1.7) ... Setting up libbsd0:amd64 (0.10.0-1) ... Setting up calendar (12.1.7) ... Processing triggers for libc-bin (2.31-3) ... Setting up libmpc3:amd64 (1.2.0-1) ... Setting up libisl22:amd64 (0.22.1-1) ... Setting up bsdmainutils (12.1.7) ... Processing triggers for man-db (2.7.6.1-2) ... Processing triggers for libc-bin (2.31-3) ...然后再用apt-get install python-pip命令包 就可以了
-
tmpfs满了?linux中tmp空间不够怎么办 tmpfs满了?linux中tmp空间不够怎么办出现原因安装数据库时,会使用到临时目录/tmp,但是/tmp太小时会报错解决办法:需要重新分配/tmp目录大小vim /etc/fstab加入一行tmpfs /tmp tmpfs nodev,nosuid,size=2G 0 0将/tmp文件更改为2G的空间,此操作需要重启才能生效。开机后使用df -h查看/tmp目录大小为2G //若有其他大小需求可自由更改异常情况?出现问题?解决办法:在命令行中输入按步骤执行以下三步:mkdir /home/usrname/tmp export TMPDIR=/home/usrname/tmp source ~/.bashrc问题就会解决了。
-
Docker系列 深度使用nextcloud(一)环境部署 什么是NextCloud开源云盘经测试NextCloud、ownCloud、Seafile、Cloudreve、dzzoffice、kiftd、Onionshare,NextCloud功能性、安全性、社区活跃度条件均具备优势。服务端支持Linux,客户端支持Windows、MacOS、Linux、Android、IOS、browser;用户体验友好,用户界面美观,文档支持包括管理手册、用户手册、开发者手册;安全性维护CVE database、注重数据安全和隐私保护、支持数据存储完整性校验、数据传输保密性、数据存储保密性、用户标识和身份鉴别、双因素鉴别、单点认证、第三方认证、用户共享、群组共享、公开共享口令、访问控制、恢复已删除的文件、找回文件历史版本、安全策略配置、文件监控和日志、安全日志审计、病毒扫描等功能。正式部署NextCloud安装MySQL/MariaDB搜索mariadb数据库容器镜像docker search mariadb拉取mariadb数据库容器镜像至本地docker pull mariadb创建并启动mariadb数据库容器,正式环境需要注意自定义用户名不能够使用常见的默认用户名、口令8位以上数字、字母、特殊字符组合,使用–name参数命名为mariadb,使用–env配置数据库用户名MARIADB_USER、数据库口令MARIADB_PASSWORD、数据库root用户口令MARIADB_ROOT_PASSWORD、数据库MARIADB_DATABASE,使用–restart=always配置Docker启动服务时mariadb容器随之启动docker run -it -d --name mariadb --env MARIADB_USER=nextcloud --env MARIADB_PASSWORD=N2yg_A9SQ --env MARIADB_ROOT_PASSWORD=D57g_5QZd --env MARIADB_DATABASE=nextcloud --restart=always mariadb 安装NextCloud搜索nextcloud容器镜像docker search nextcloud拉取nextcloud容器镜像至本地docker pull nextcloud创建并启动nextcloud容器,使用–name参数命名为nextcloud,使用-p参数将nextcloud容器80端口映射至宿主机80端口,使用-p参数将nextcloud容器443端口映射至宿主机443端口,使用–link参数使正在创建的nextcloud容器网络连接至mariadb数据库容器,onlyoffice因配置时不支持使用该方式直接访问,故仍然使用端口访问的方式配置,使用–restart=always配置Docker启动服务时nextcloud容器随之启动docker run -it -d -p8800:80 -v /mnt/ydyp/nextcloud:/var/www/html --name nextcloud --link mariadb --restart=always nextcloud 初始化NextCloud默认使用HTTP的方式访问NextCloud,IP地址为宿主机IP地址,端口为宿主机8088端口http://localhost:8088正常访问nextcloud管理界面后,在该位置创建管理员账号,自定义用户名、口令,选择存储与数据库使用MySQL/MariaDB后点击安装并遵循安装指引完成安装初始化时创建管理员用户,该位置用户名、口令为手动配置http://localhost:8088 username:management password:NAyQ_29Sg配置NextCloud连接的数据库,配置数据库连接用户名、口令,该位置host因使用nextcloud容器已使用–link参数连接mariadb,可填写mariadb或填写IP地址MySQL/MariaDB username:nextcloud password:N2yg_A9SQ database:nextcloud host:mariadb点击安装-安装推荐的应用,或者点击取消可以取消安装应用,安装完成后亦可以自定义增删应用安装完成后默认进入仪表盘,使用说明参见https://docs.nextcloud.com/server/latest/user_manual/